Running Inference
Once a surrogate model is trained, you can run inference to predict simulation outputs for new input configurations, without launching a solver. Inference runs in seconds instead of hours, enabling rapid design space exploration, sensitivity analysis, and optimization studies.
AI Physics offers multiple inference options: in AI Physics Training for model development, in AI Physics Inference for production workflows, locally with custom user interfaces, and natively within CAD tools.
Highlights
- Instant predictions: Get simulation results in seconds instead of hours
- Multiple inference environments: Run inference in the cloud, on your workstation, or directly in CAD tools
- Confidence signals: Uncertainty Quantification tells you when to trust predictions and when to validate
- CAD integration: Run inference natively in Blender and Autodesk Alias
Run Inference in AI Physics Training
You can run inference directly in AI Physics Training from any trained model. This is the fastest way to test predictions during model development.
Start an Inference Session
- In AI Physics Training, navigate to Models and select a model.
- Click Predict in the upper right.
Choose an Inference Mode
The Predict dialog offers two options:
Interactive prediction Adjust geometry and inputs, run a prediction, and inspect the results. Use this to test individual design points and validate model behavior.
Use in a Design Run Explore parameter combinations or optimize a design with the Model and its geometry connected. This creates a new Exploration. See Surrogate Model Explorations for details.
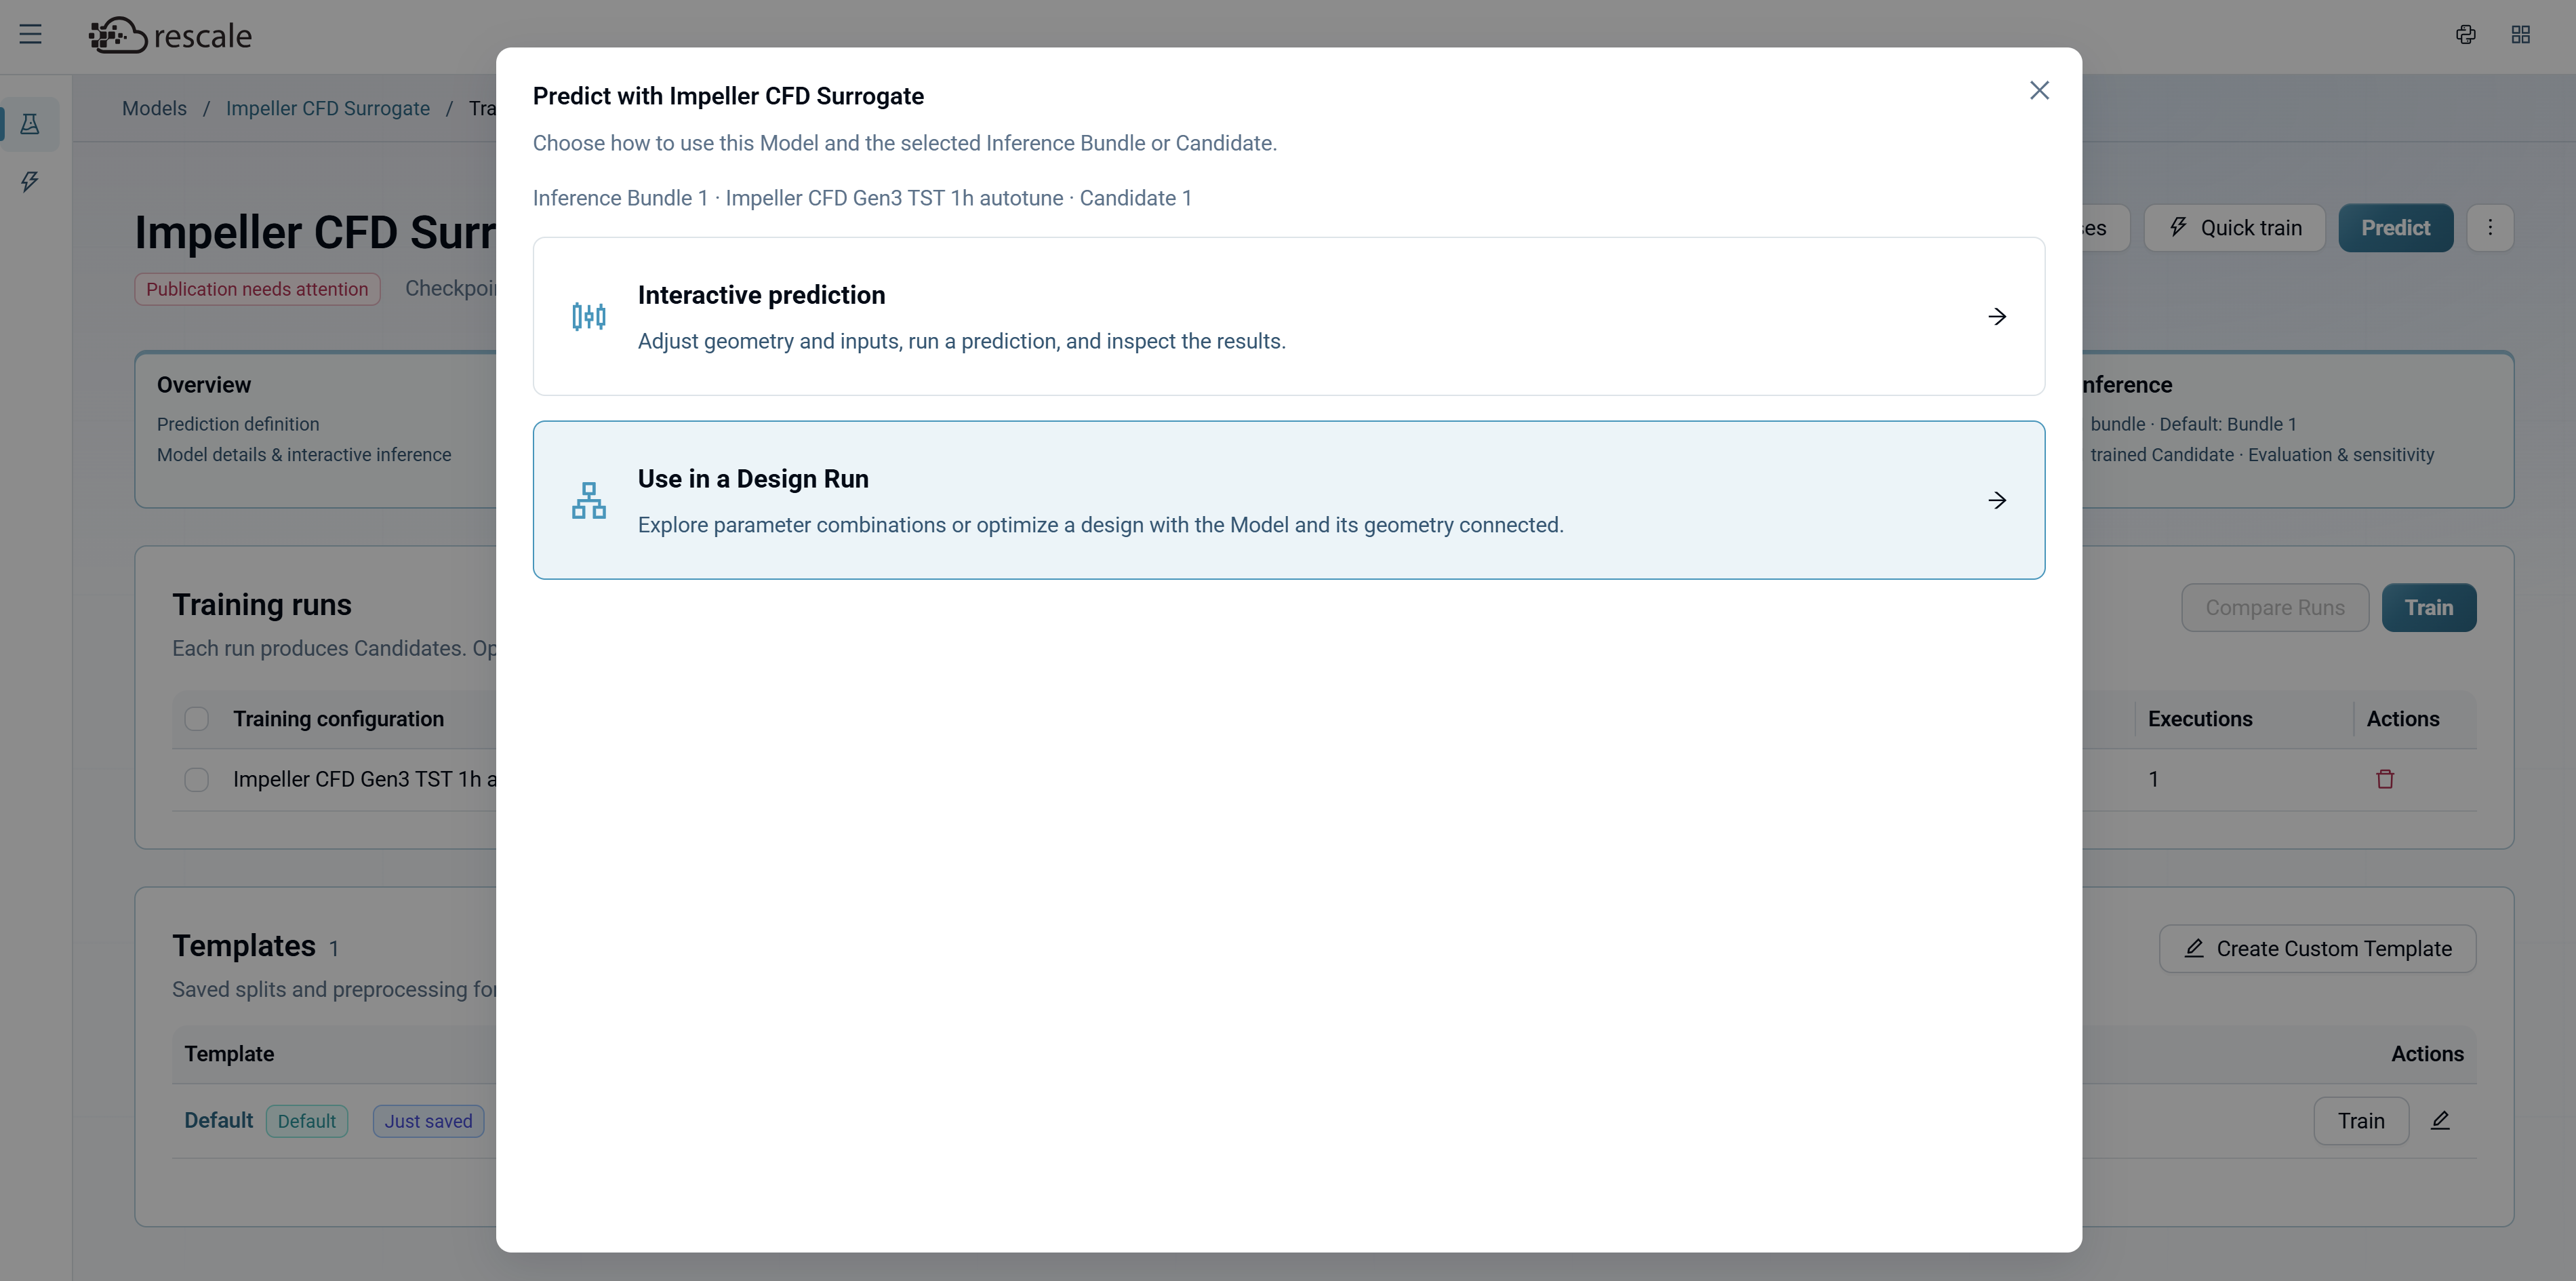
Select Interactive prediction to continue.
Run Interactive Inference
The Interactive prediction interface opens with:
- Input sliders (left panel) — Adjust design variables (e.g., D0, d3, AngleBeta1, AngleBeta2, D0, OutletP, RPM, b2, d0).
- Run Inference button — Click to generate predictions with the current input values.
- 3D geometry preview (center) — Shows the parametric geometry corresponding to the current inputs.
- Results panel (appears after inference runs) — Displays predicted outputs and uncertainty quantification.
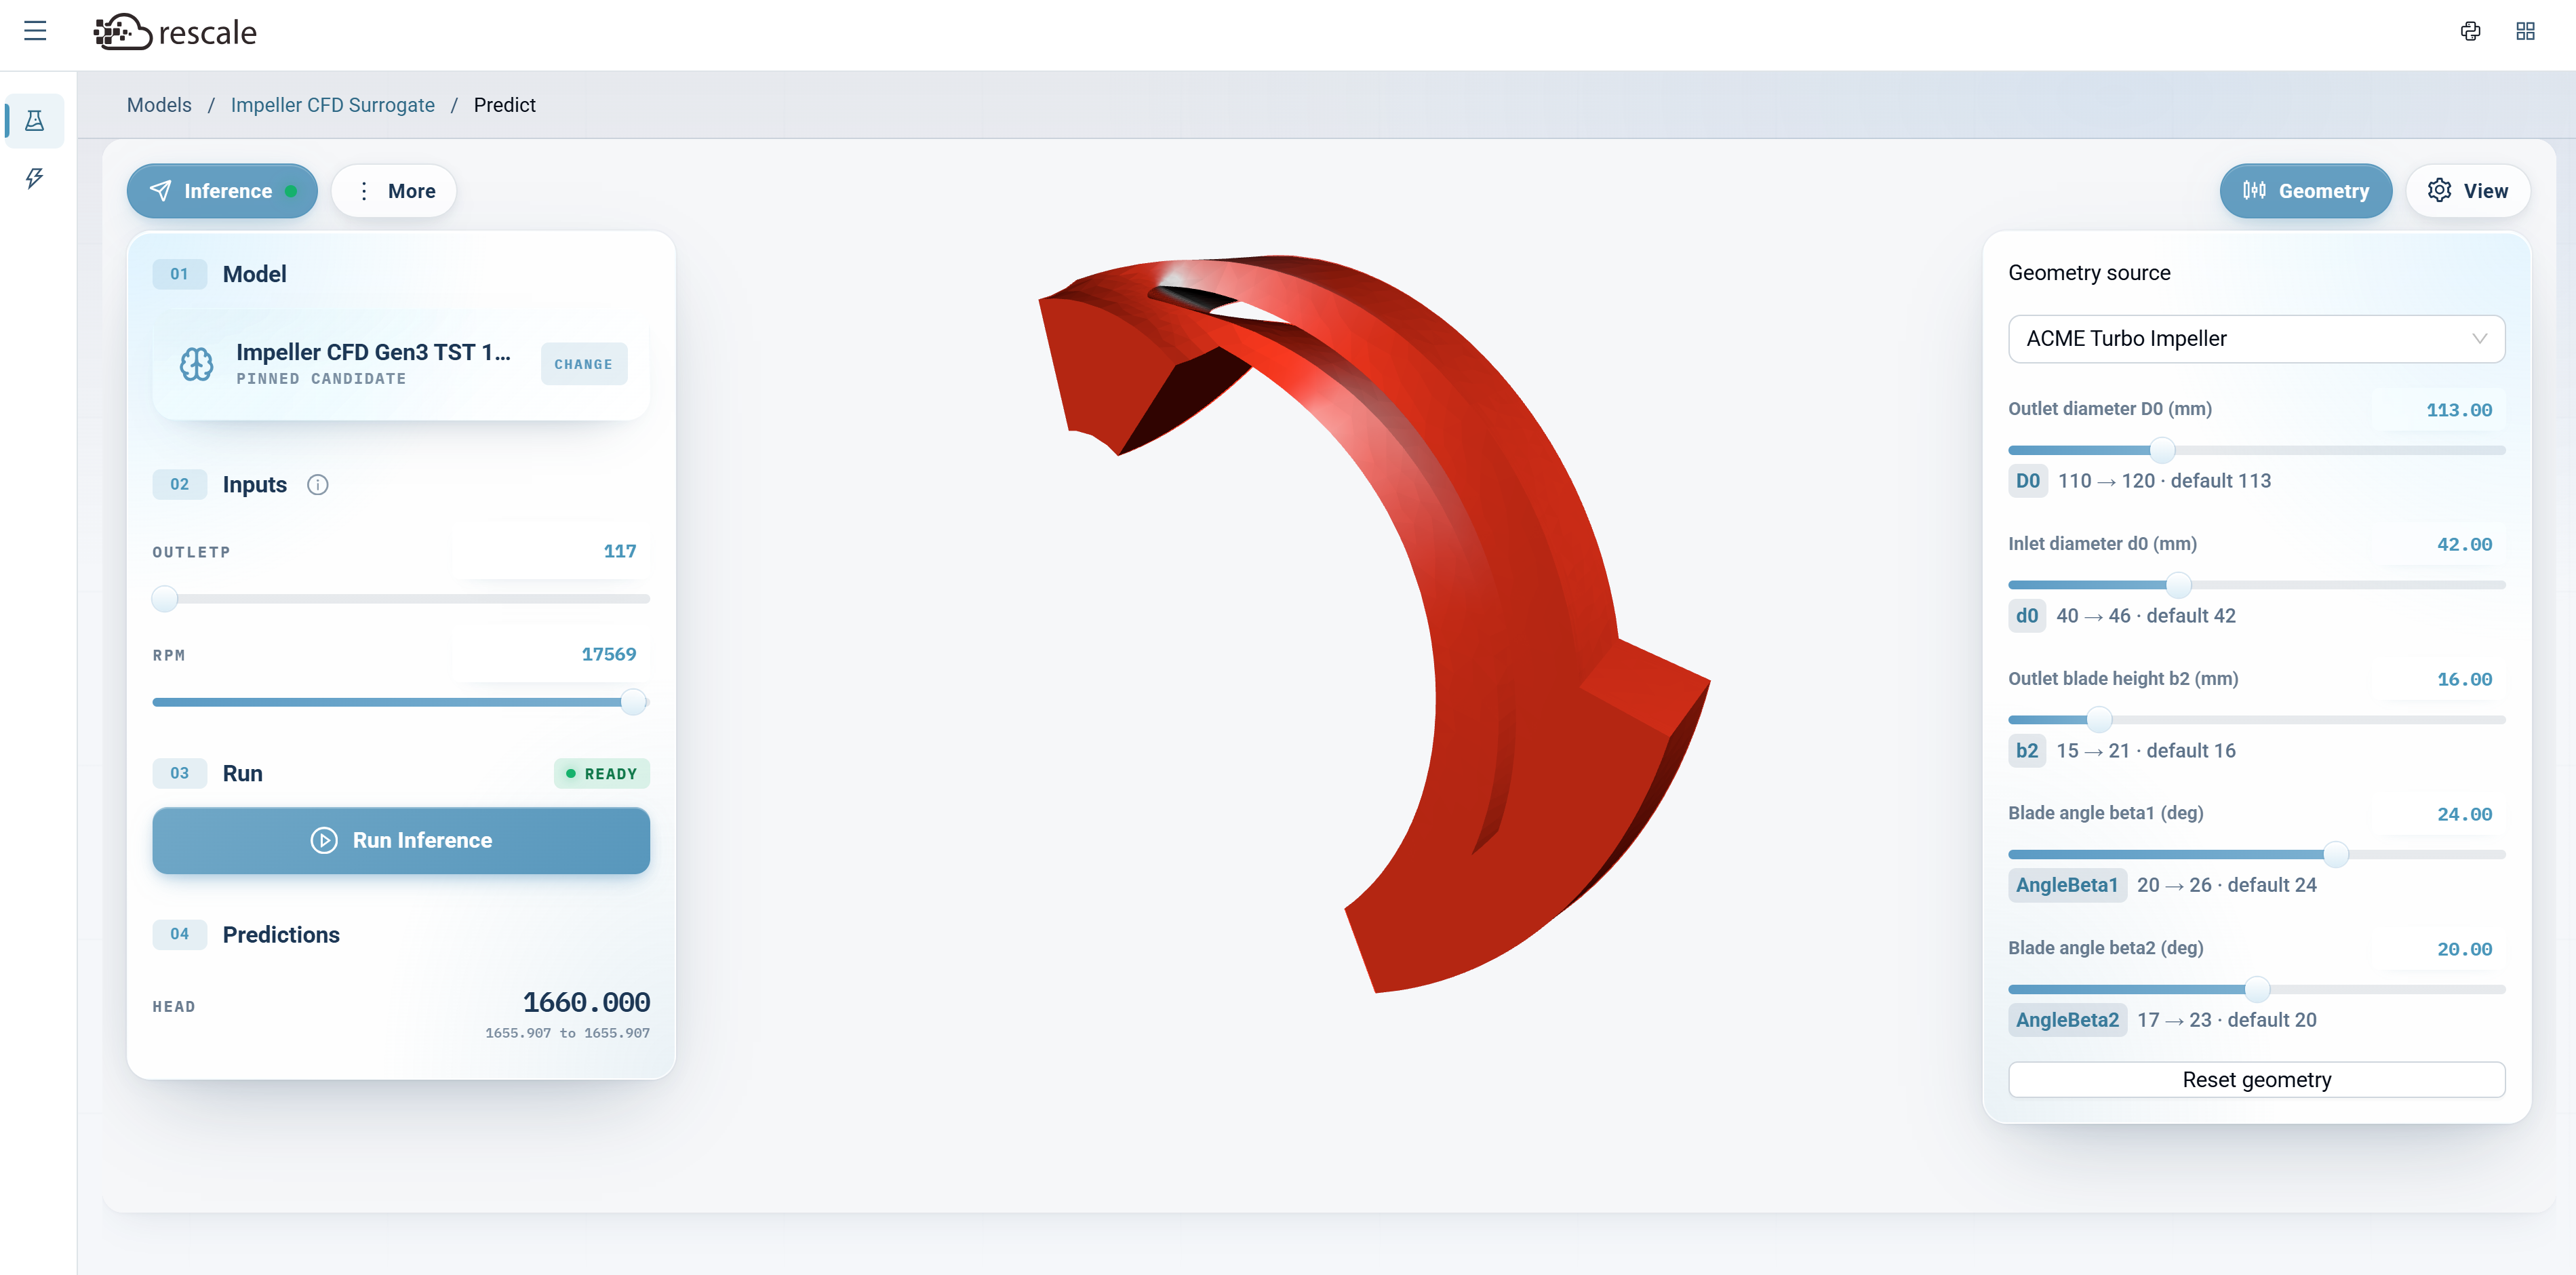
Adjust the input sliders to the design point you want to test, then click Run Inference.
Review Results with Uncertainty Quantification
After inference completes, results display in the left panel:
Predictions Predicted output values
Uncertainty Confidence signals telling you whether to trust this prediction:
- Trust Level: High Trust / Low Trust
- Bounds Check: Whether inputs are In Bounds (within training data range) or Out of Bounds
- Ensemble Agreement: How closely ensemble models agree (High Agreement / Low Agreement)
- Model agreement percentage: Numeric agreement score (e.g., 98%)
A High Trust prediction with In Bounds inputs and High Agreement can be used with confidence. A Low Trust or Very Low Trust prediction should be validated with a full simulation.
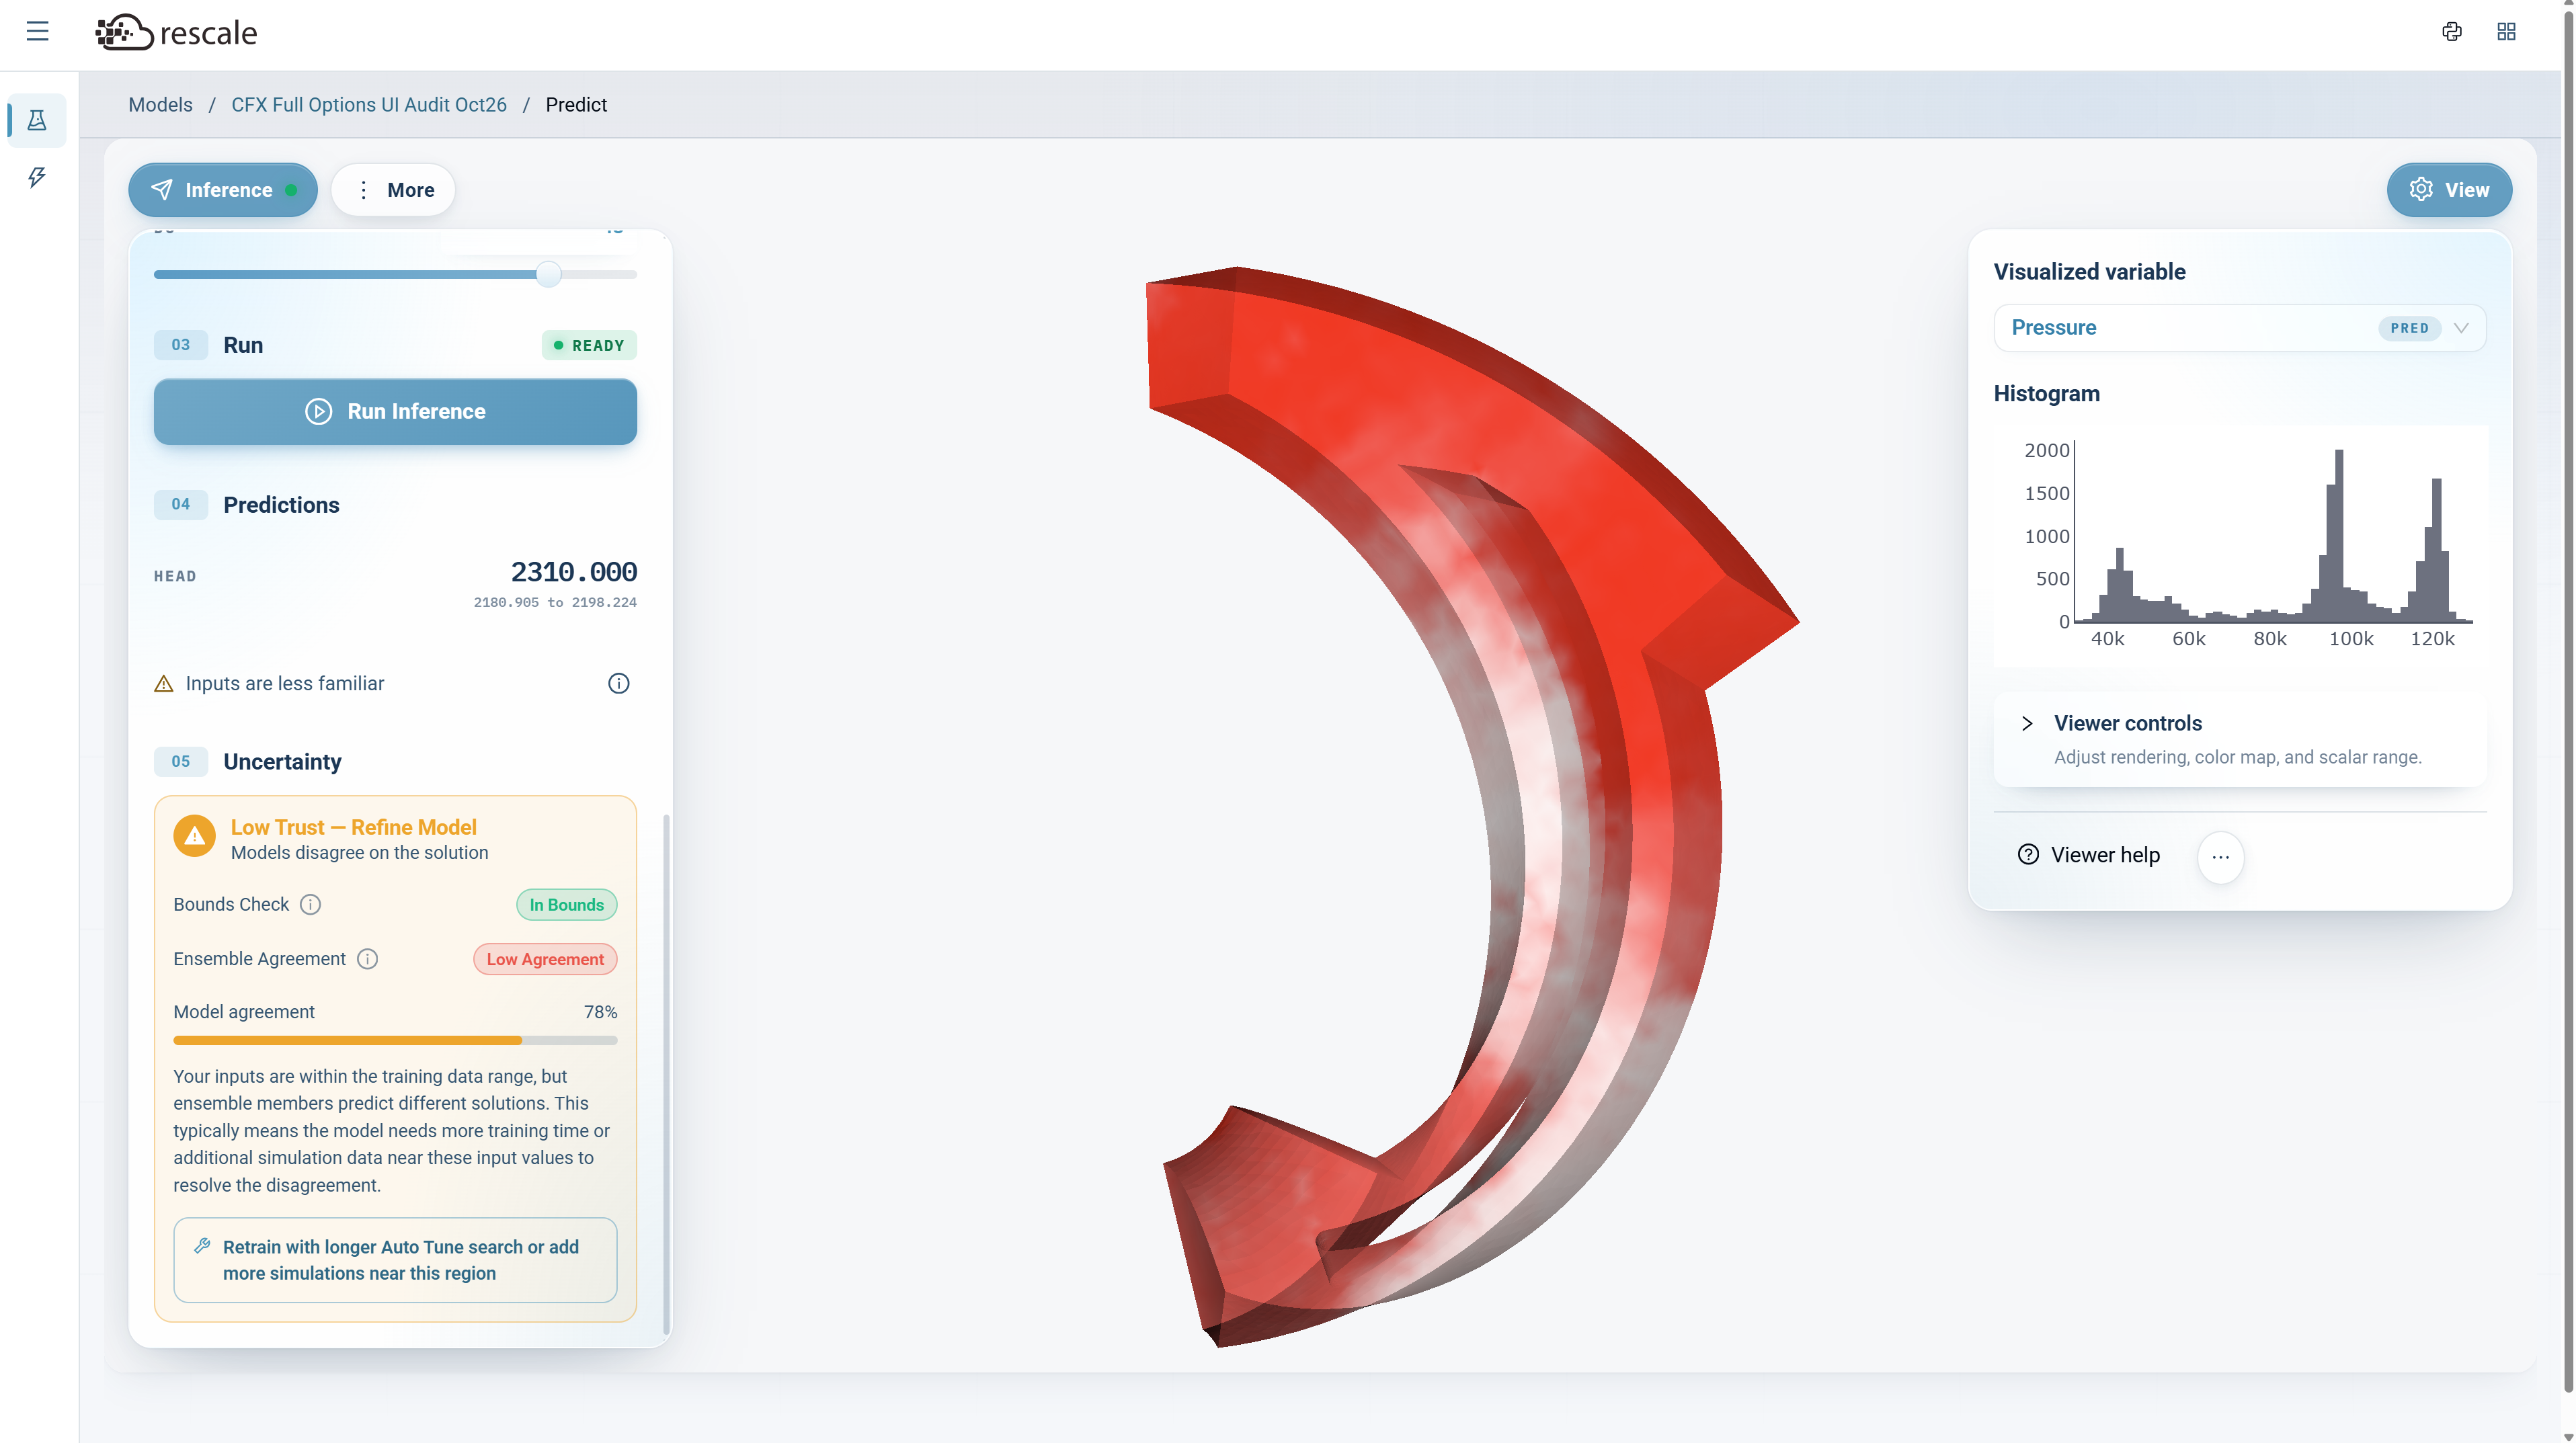
Note: Uncertainty Quantification requires that the model was trained using Auto Tune with Uncertainty Ensemble selected and a trained OOD detector. See Train an OOD Detector in the Uncertainty Quantification section below.
Run Inference in AI Physics Inference
AI Physics Inference is a dedicated inference environment that does not require a storage device. Use this for production workflows where you're running inference repeatedly on new designs.
- From the Rescale platform, navigate to AI Models and click Run Inference. This will launch a workstation with AI Physics Inference.
- Once the workstation has launched, click Open App from the workstation Status page.
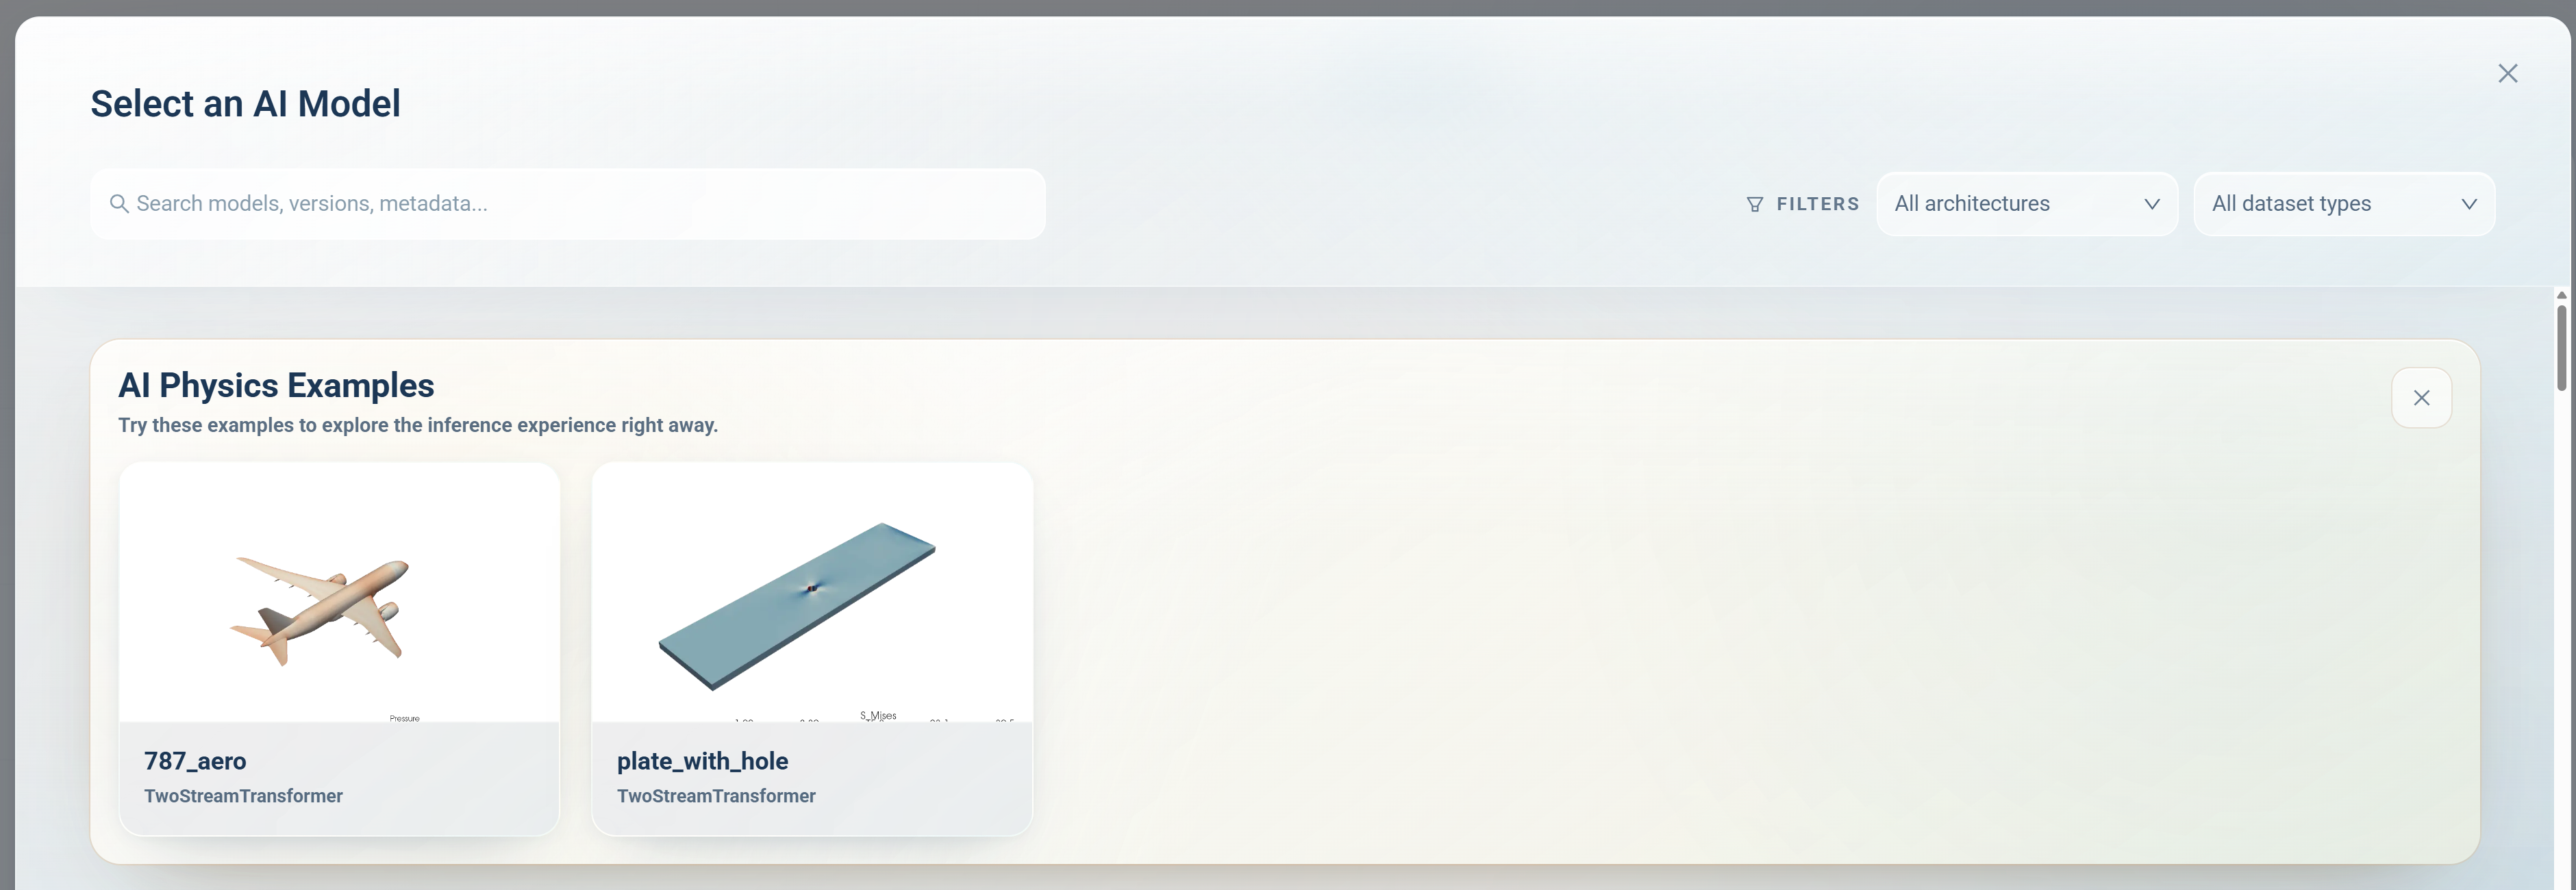
- From Inference, select the AI Model you want to run inference on.
- Provide your input values or Upload a new geometry
- Click Run Inference to generate predictions.
Results are returned with the same visualizations as AI Physics Training.
Run Inference Locally
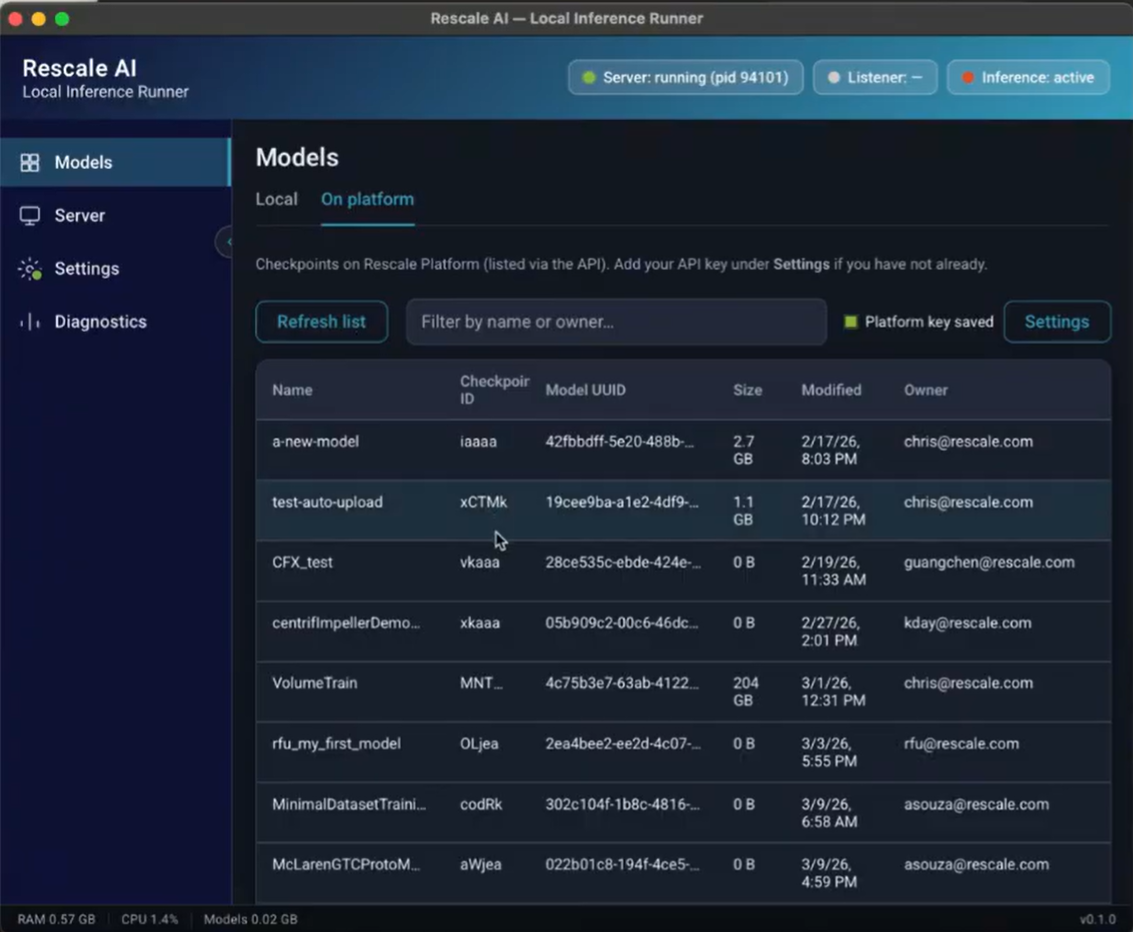
The local inference runner and client let you download trained models from Rescale and run inference on any workstation or laptop, including offline and on-premises environments. The rescale-ai-client Python package provides access to the local inference runner and a standard API for building custom interfaces.
The installer for the local inference runner is available from the Rescale platform by selecting User Preferences → API. In the Rescale AI Physics Local Inference section, select the OS of your local system and click Download to download the installation file.
Note: For a license to the local inference application, contact your Rescale representative.
Run Inference in CAD Tools
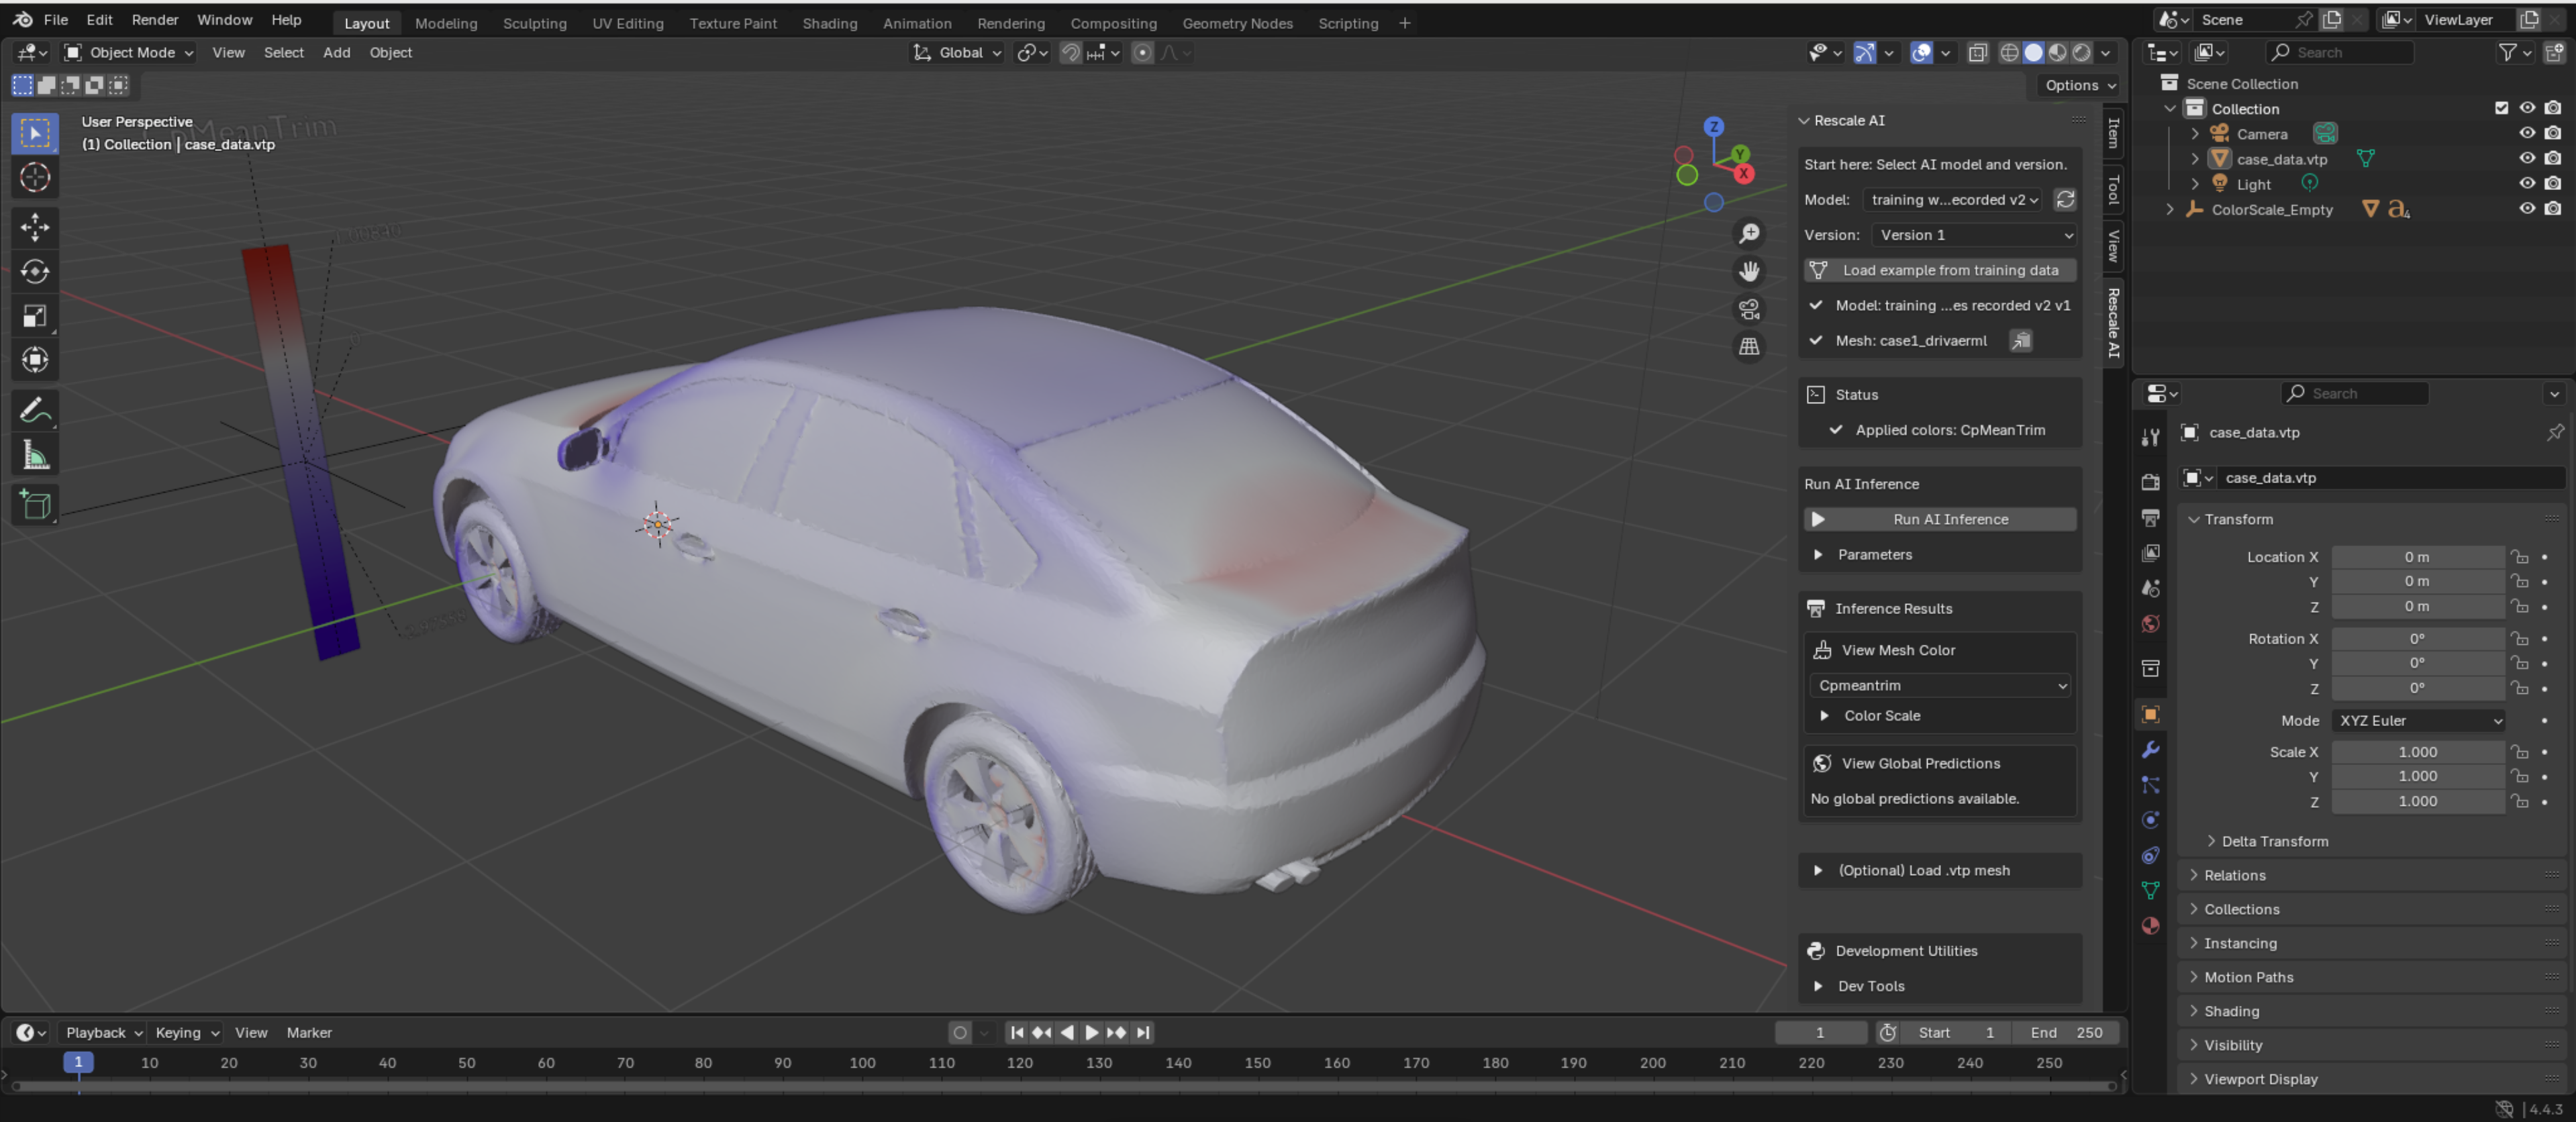
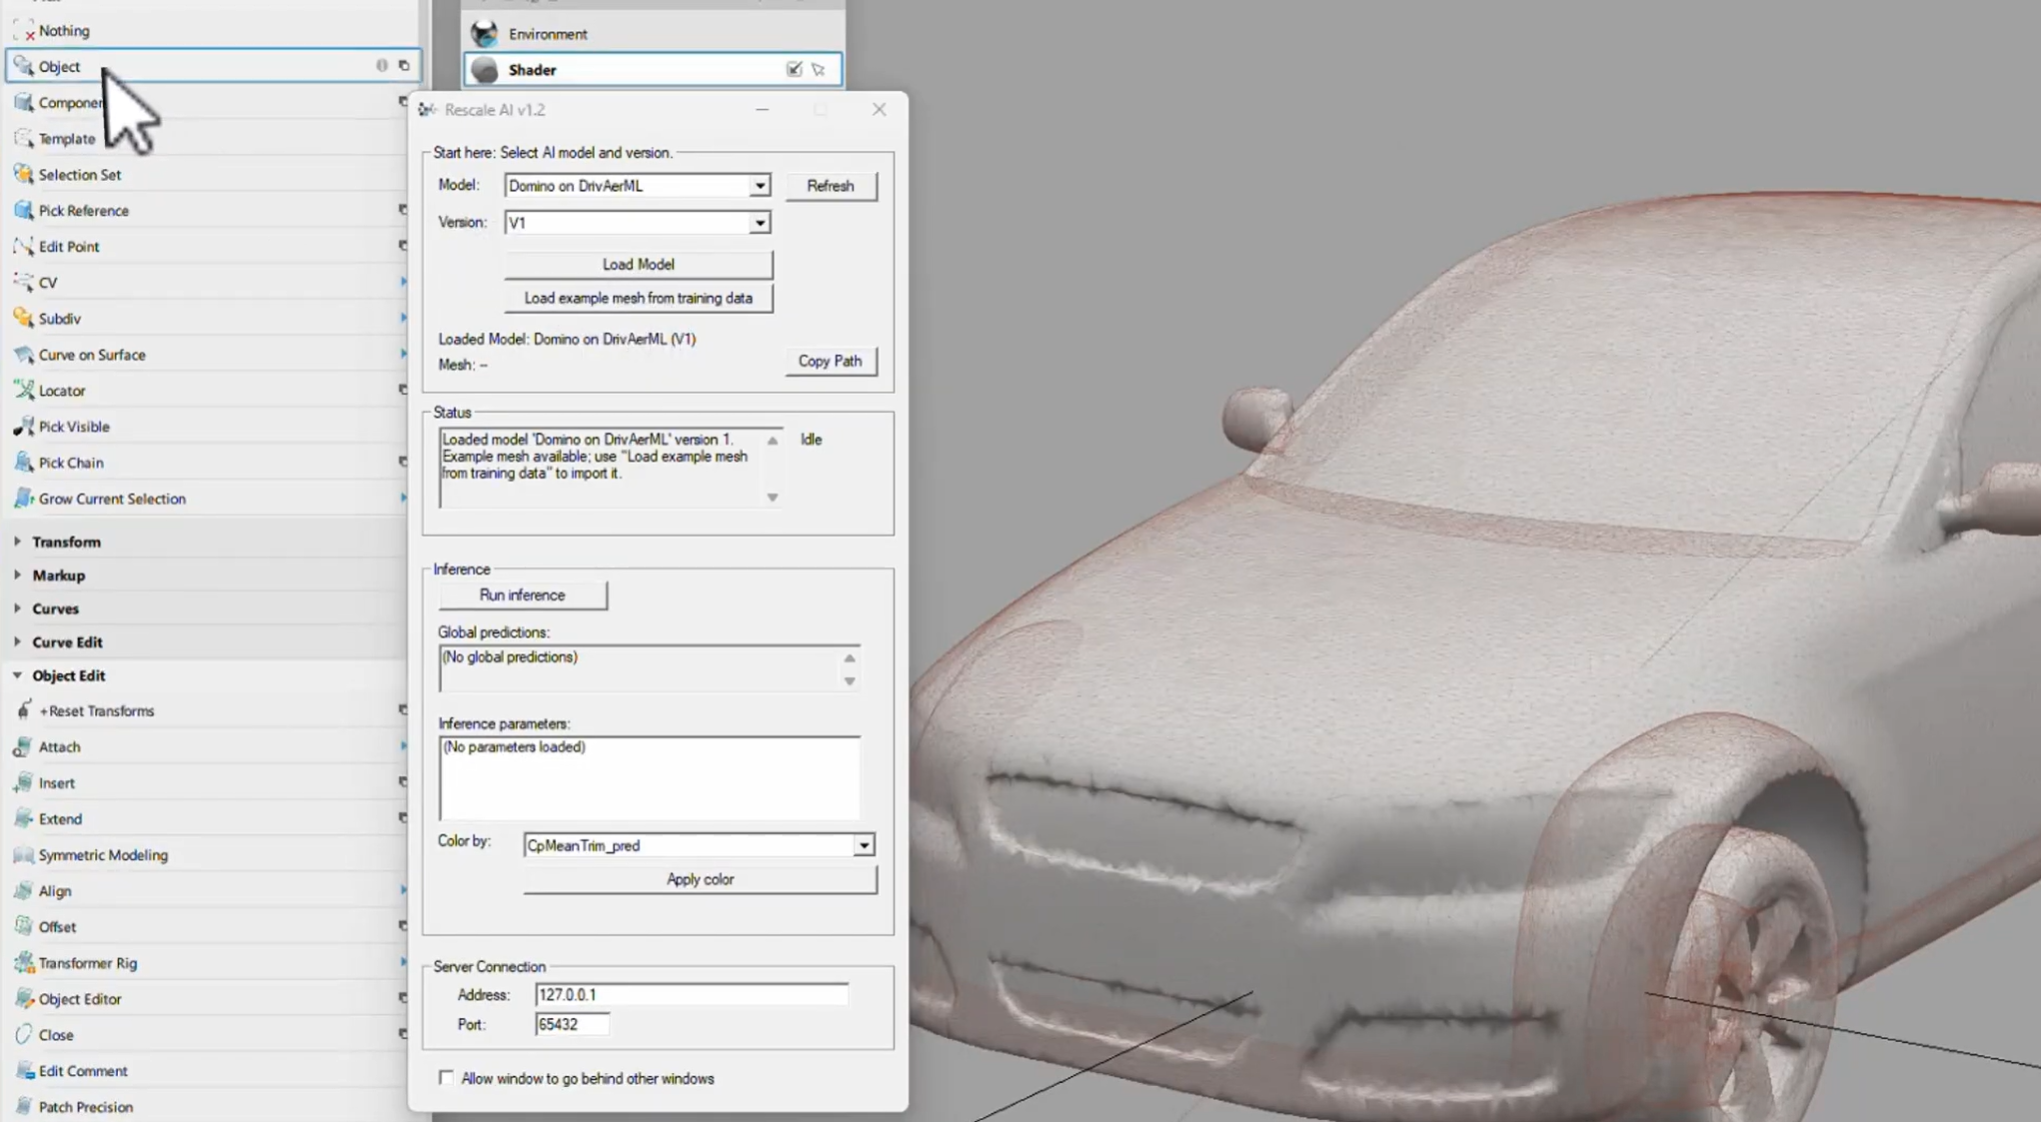
Rescale provides inference plug-ins for Blender and Autodesk Alias so designers can run surrogate model predictions natively within their CAD environment.
Blender Plug-In
You can run inference in Blender by selecting Run inference in Blender from any model version.
Autodesk Alias Plug-In
Note: For access to the Autodesk Alias inference plug-in, contact your Rescale representative.
The Alias plug-in integrates directly into the Alias Design interface. Select a surface or geometry, choose a trained model, and run inference without leaving your CAD session.
Uncertainty Quantification
Uncertainty Quantification (UQ) provides confidence signals for every surrogate model prediction, helping you understand when to trust a prediction and when to validate with a full simulation. UQ is available in AI Physics Training, AI Physics Inference, and through the local inference runner.
Why Uncertainty Quantification Matters
Surrogate models are powerful tools for rapid design exploration, but like any predictive model, they have limits. A model trained on specific simulation data may produce unreliable predictions when:
- Input parameters fall outside the range of the training data
- Geometry differs significantly from training examples
- The model is asked to predict in regions where training data is sparse
Without confidence signals, you have no way to distinguish reliable predictions from unreliable ones, which leads to either over-reliance on bad predictions or unnecessary validation of good ones.
How Uncertainty Quantification Works
UQ combines two independent signals to assess prediction reliability:
Out-of-Distribution (OOD) Detection Checks whether input geometry and parameters fall within the range of simulation data used to train the model. If your input is outside the training bounds, the model is extrapolating rather than interpolating, which is a warning flag for lower reliability. Requires an OOD detector to be trained (see Train an OOD Detector).
Ensemble Agreement Measures how closely multiple independently trained models agree on the prediction. High agreement means all models converge to the same answer, indicating a stable prediction. Low agreement means the models diverge, suggesting uncertainty in that region of the design space.
These signals are combined into a single trust level displayed with every inference result.
Train an OOD Detector
Before you can use Uncertainty Quantification in your inference results, you need to train an Out-of-Distribution (OOD) detector. The OOD detector learns the distribution of your training data so it can flag when new inputs fall outside that distribution.
Create an OOD Detector
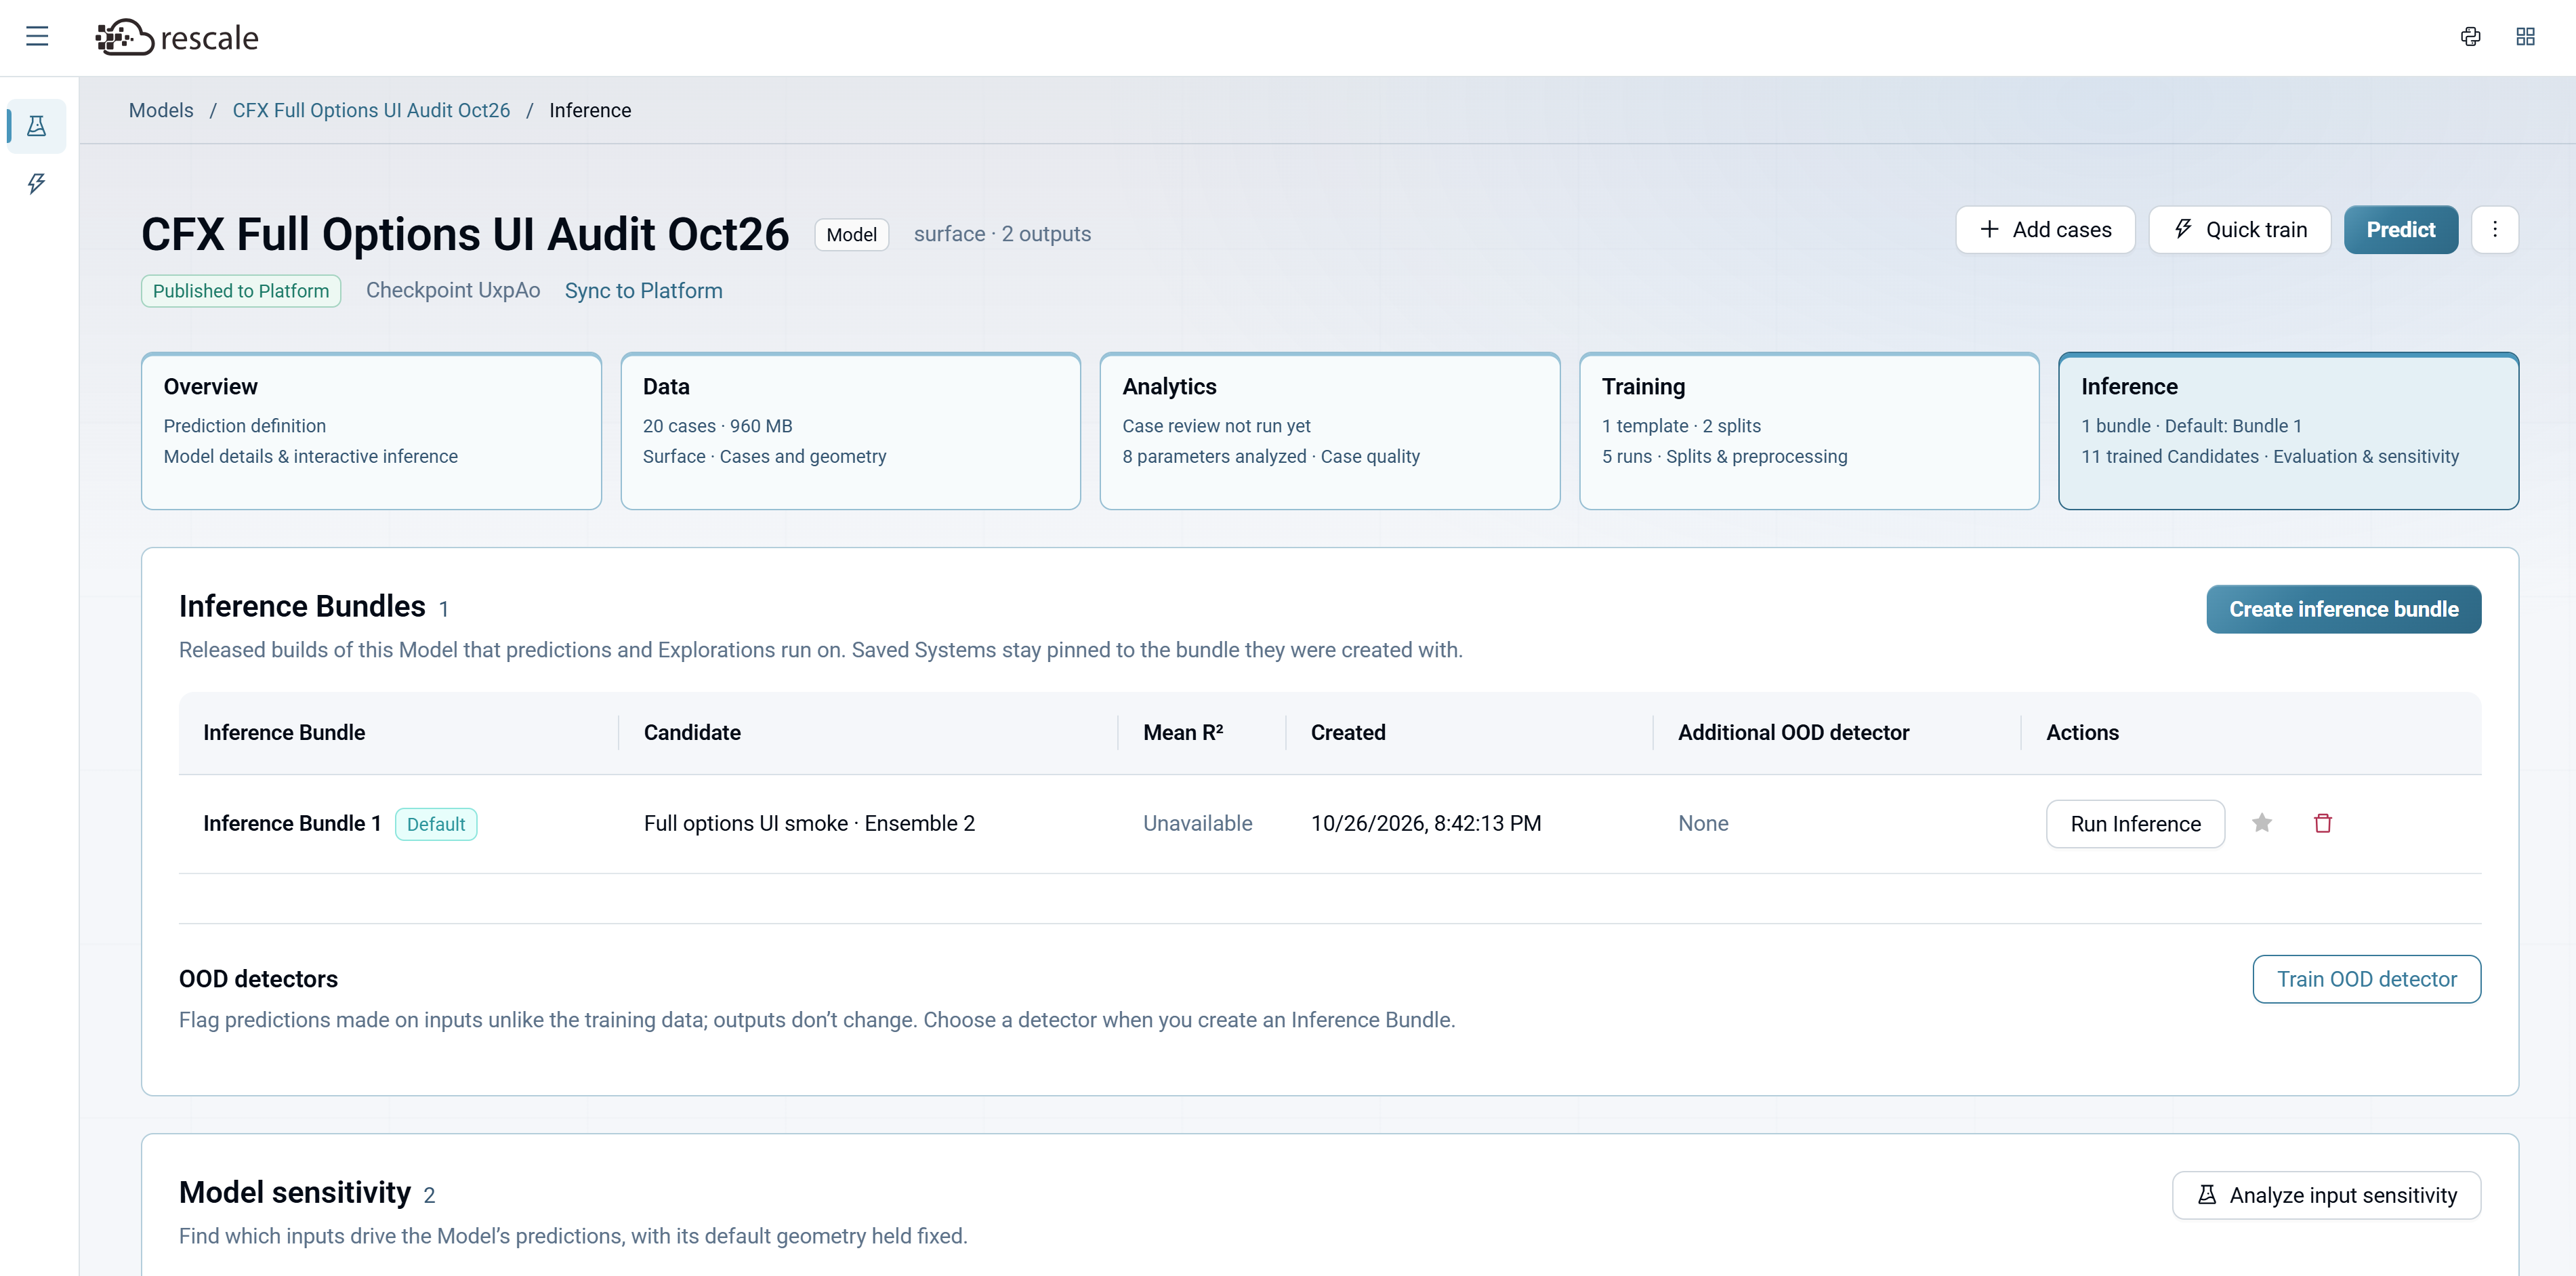
- From your model's Inference tab, scroll down to the OOD detectors section.
- Click Train OOD detector.
Configure the Detector
In the Train OOD detector dialog:
- Detector name: Enter a descriptive name (e.g., "Input distribution detector").
- Training reference: The model candidate to train the detector against (auto-selected from the current model).
- Epochs: Number of training epochs (default: 50). Higher values may improve accuracy but take longer to train.
Click Train on this workstation to begin training.
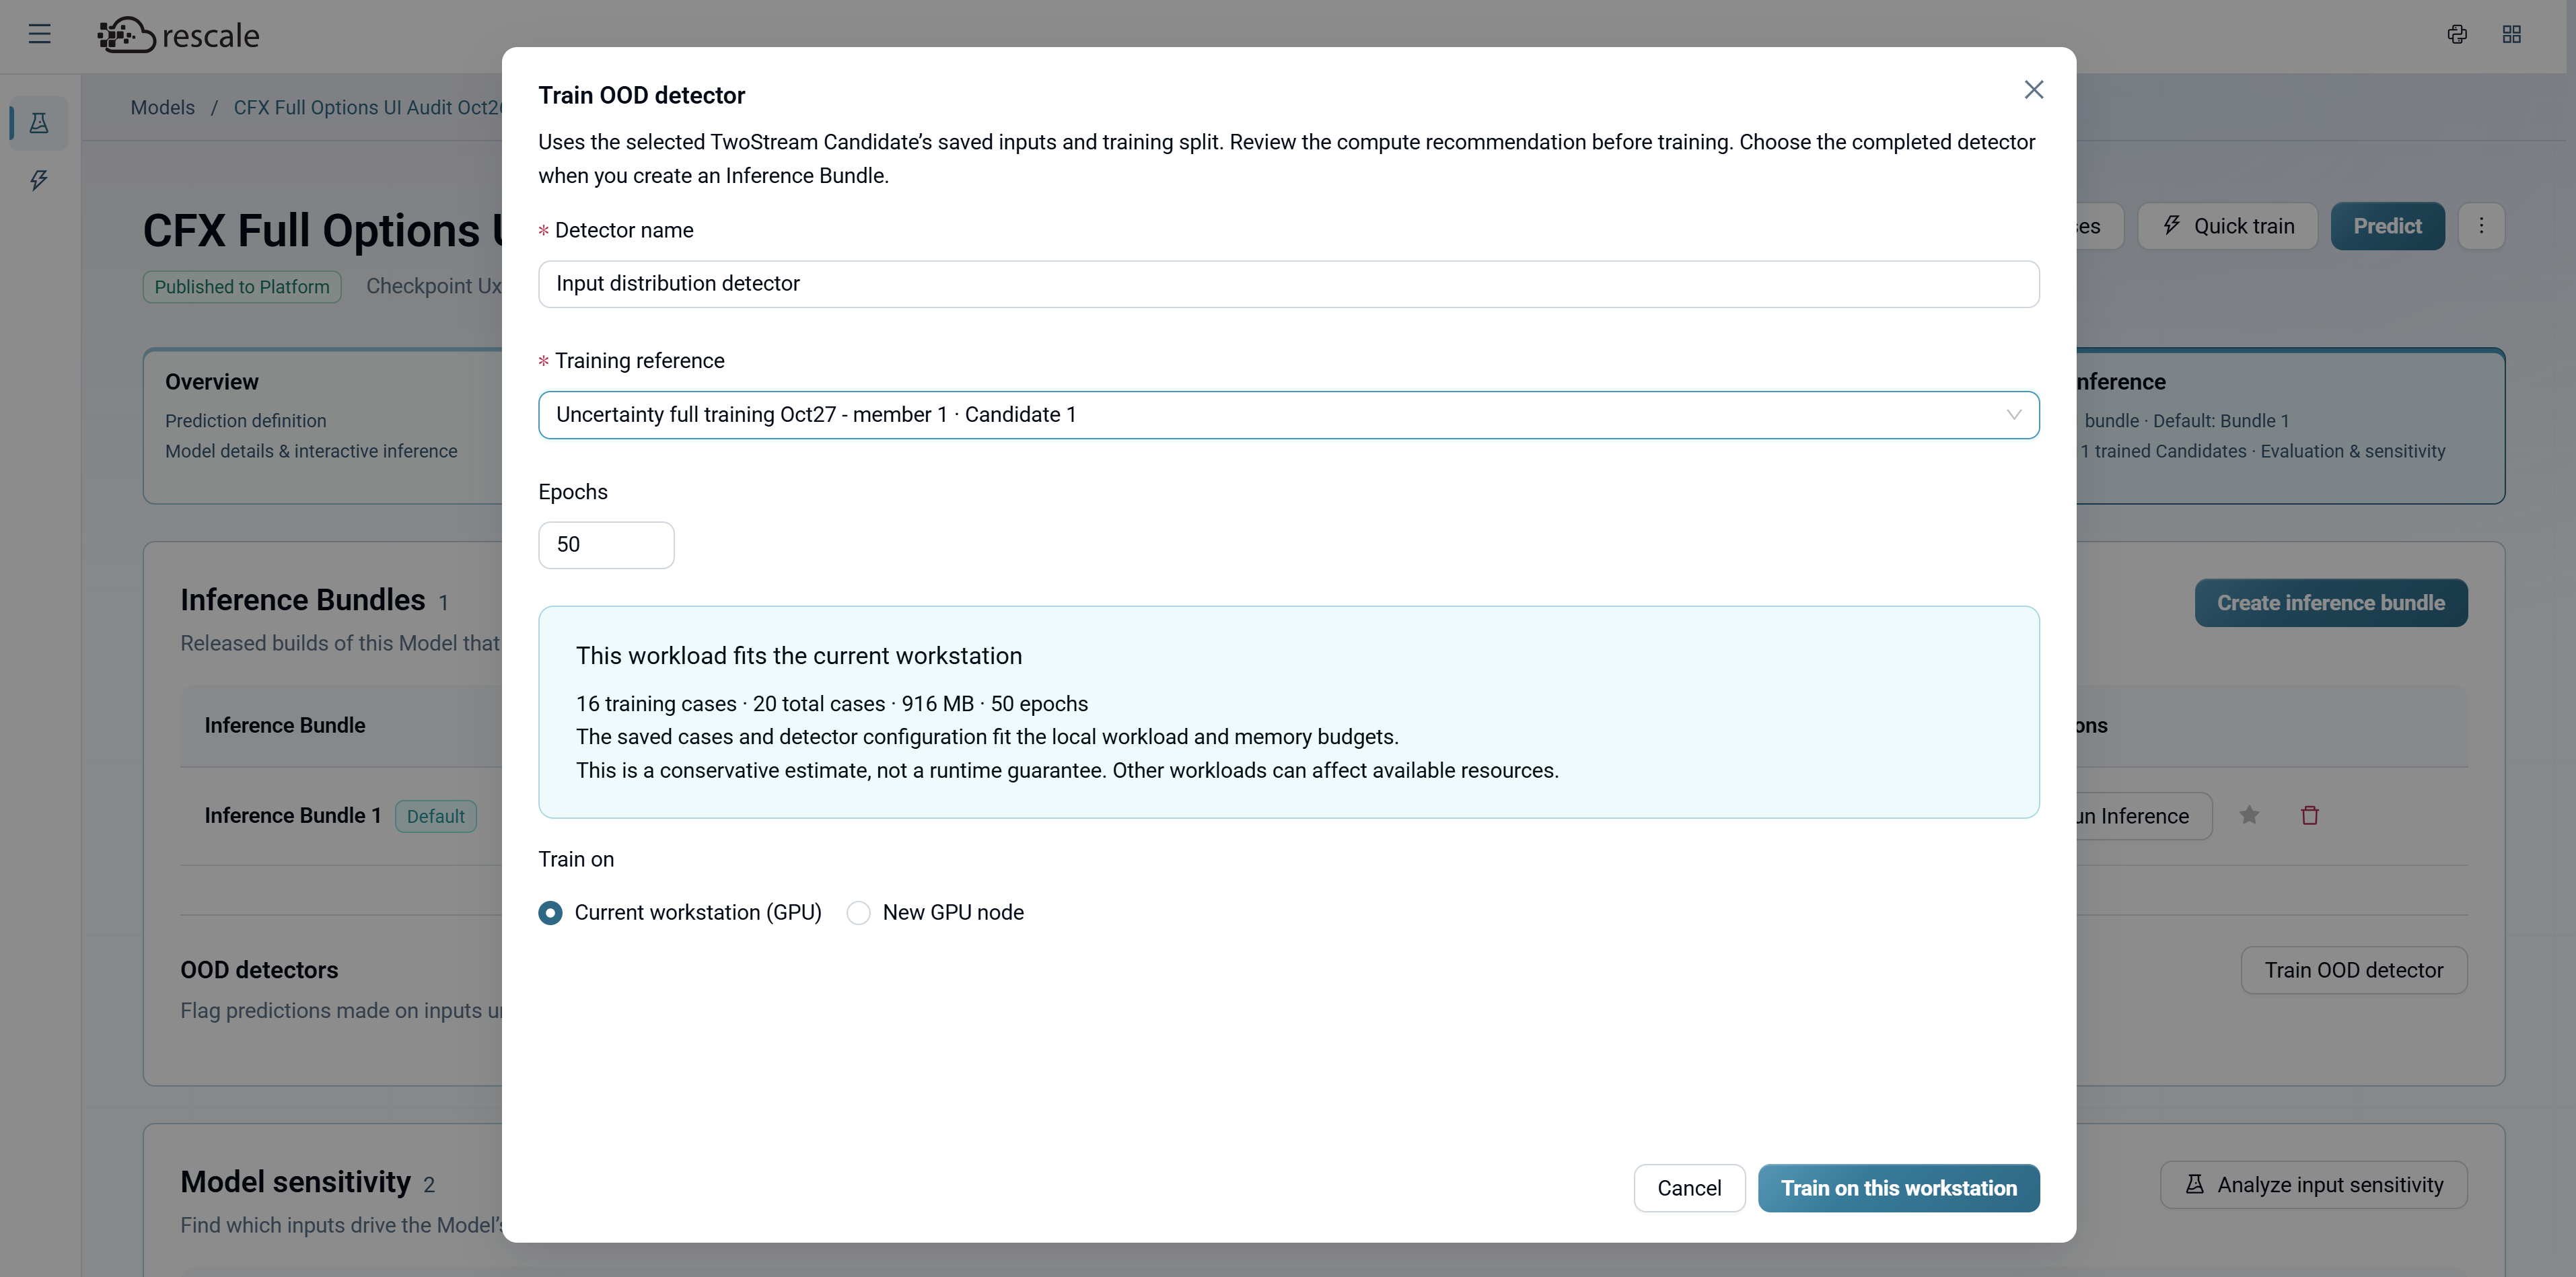
Training typically completes in a few minutes. Once complete, the detector appears in the OOD detectors table with status Ready to attach.
Attach the Detector to an Inference Bundle
Once trained and reviewed:
- Return to the model's Inference tab.
- Create an Inference Bundle (click Create inference bundle).
- In the Inference Bundle configuration, select the OOD detector you just trained.
Now, any inference run using this Inference Bundle will include Uncertainty Quantification signals.
Using Confidence Signals in Practice
During model development (AI Physics Training):
- Run inference on test cases across your design space
- Identify regions where confidence is Low
- Add simulation data in those regions and retrain to improve coverage
In production workflows (AI Physics Inference):
- Use High-confidence predictions directly in your design workflow
- Flag Low-confidence predictions for validation with full simulations
- Avoid committing to designs with Low confidence without validation
In optimization studies (Surrogate Model Explorations):
- Confidence indicators appear on every candidate in the Pareto front
- Prioritize High-confidence designs when selecting final candidates
- Validate Low-confidence designs at the aggressive end of the Pareto front before committing
Best Practices for Uncertainty Quantification
Start with a representative design space Ensure your training data covers the full range of inputs you plan to query during inference. Uncertainty Quantification helps you find gaps, but it's more efficient to cover the space well from the start.
Use confidence signals to guide validation Rather than validating every prediction, focus validation effort on Low confidence results. This balances speed (from surrogate predictions) with rigor (from targeted validation).
Expand training data strategically When you encounter Low confidence regions during production use, add simulation data in those regions and retrain. This iteratively improves model coverage and confidence.
Best Practices
Validate Against Full Simulations
Surrogate predictions are most reliable within the range of inputs covered by your training data. Before using the model for critical decisions:
- Run a sample of surrogate predictions on inputs you have run full simulations for.
- Compare surrogate predictions to ground-truth solver results.
- Verify that errors are within acceptable tolerance for your application.
This gives you confidence in the model's accuracy before applying it to new, unseen inputs.
Use Uncertainty Quantification to Guide Validation
When running inference at scale, use the confidence signals from Uncertainty Quantification to focus validation effort where it matters most. High-confidence predictions can be used directly, while Low confidence predictions should be validated with full simulations. See Uncertainty Quantification for details.
FAQ
Do I need to train an OOD detector before running inference? No, you can run inference without an OOD detector. However, without one, your results won't include Uncertainty Quantification signals (Bounds Check and Trust Level). Train an OOD detector if you want confidence signals to help you decide which predictions to trust.
How long does it take to train an OOD detector? Typically a few minutes. The default 50 epochs is sufficient for most models. You can adjust the number of epochs in the Train OOD detector dialog if needed.
Can I have multiple OOD detectors for one model? Yes. You might train multiple detectors with different threshold settings or epoch counts, then compare their performance before choosing which to attach to an Inference Bundle.
What if my OOD detector shows many cases as "Out of distribution"? If training cases are flagged as out of distribution, your thresholds may be too strict. Review the detector's Advanced diagnostics, adjust the thresholds, and click Save Detection Settings. If the issue persists, the detector may need more training epochs or your training data may have outliers that should be excluded.
Can I run inference without Interactive prediction? Yes. You can also run inference through Explorations (click Use in a Design Run in the Predict dialog), or use AI Physics Inference, the local inference runner, or CAD plug-ins. See the sections below for details.
What's Next
- Run design space explorations: Use the Use in a Design Run option to create Explorations for sweeps and optimization studies. See Surrogate Model Explorations.
- Integrate with optimization workflows: Feed surrogate predictions into optimization tools for faster design optimization cycles.
- Build custom inference interfaces: Use the
rescale-ai-clientpackage to integrate surrogate models into your existing engineering workflows and scripts.