Building workflow templates
A Workflow Template is the reusable foundation of every workflow run. You build a workflow template once: configuring nodes, connecting them in sequence, and defining the parameters that runners fill in at execution time. Once saved, it can be shared with your team and run as many times as needed without modification.
Navigate to Workflows
- Sign in to the Rescale platform.
- In the left navigation, click Workflows.
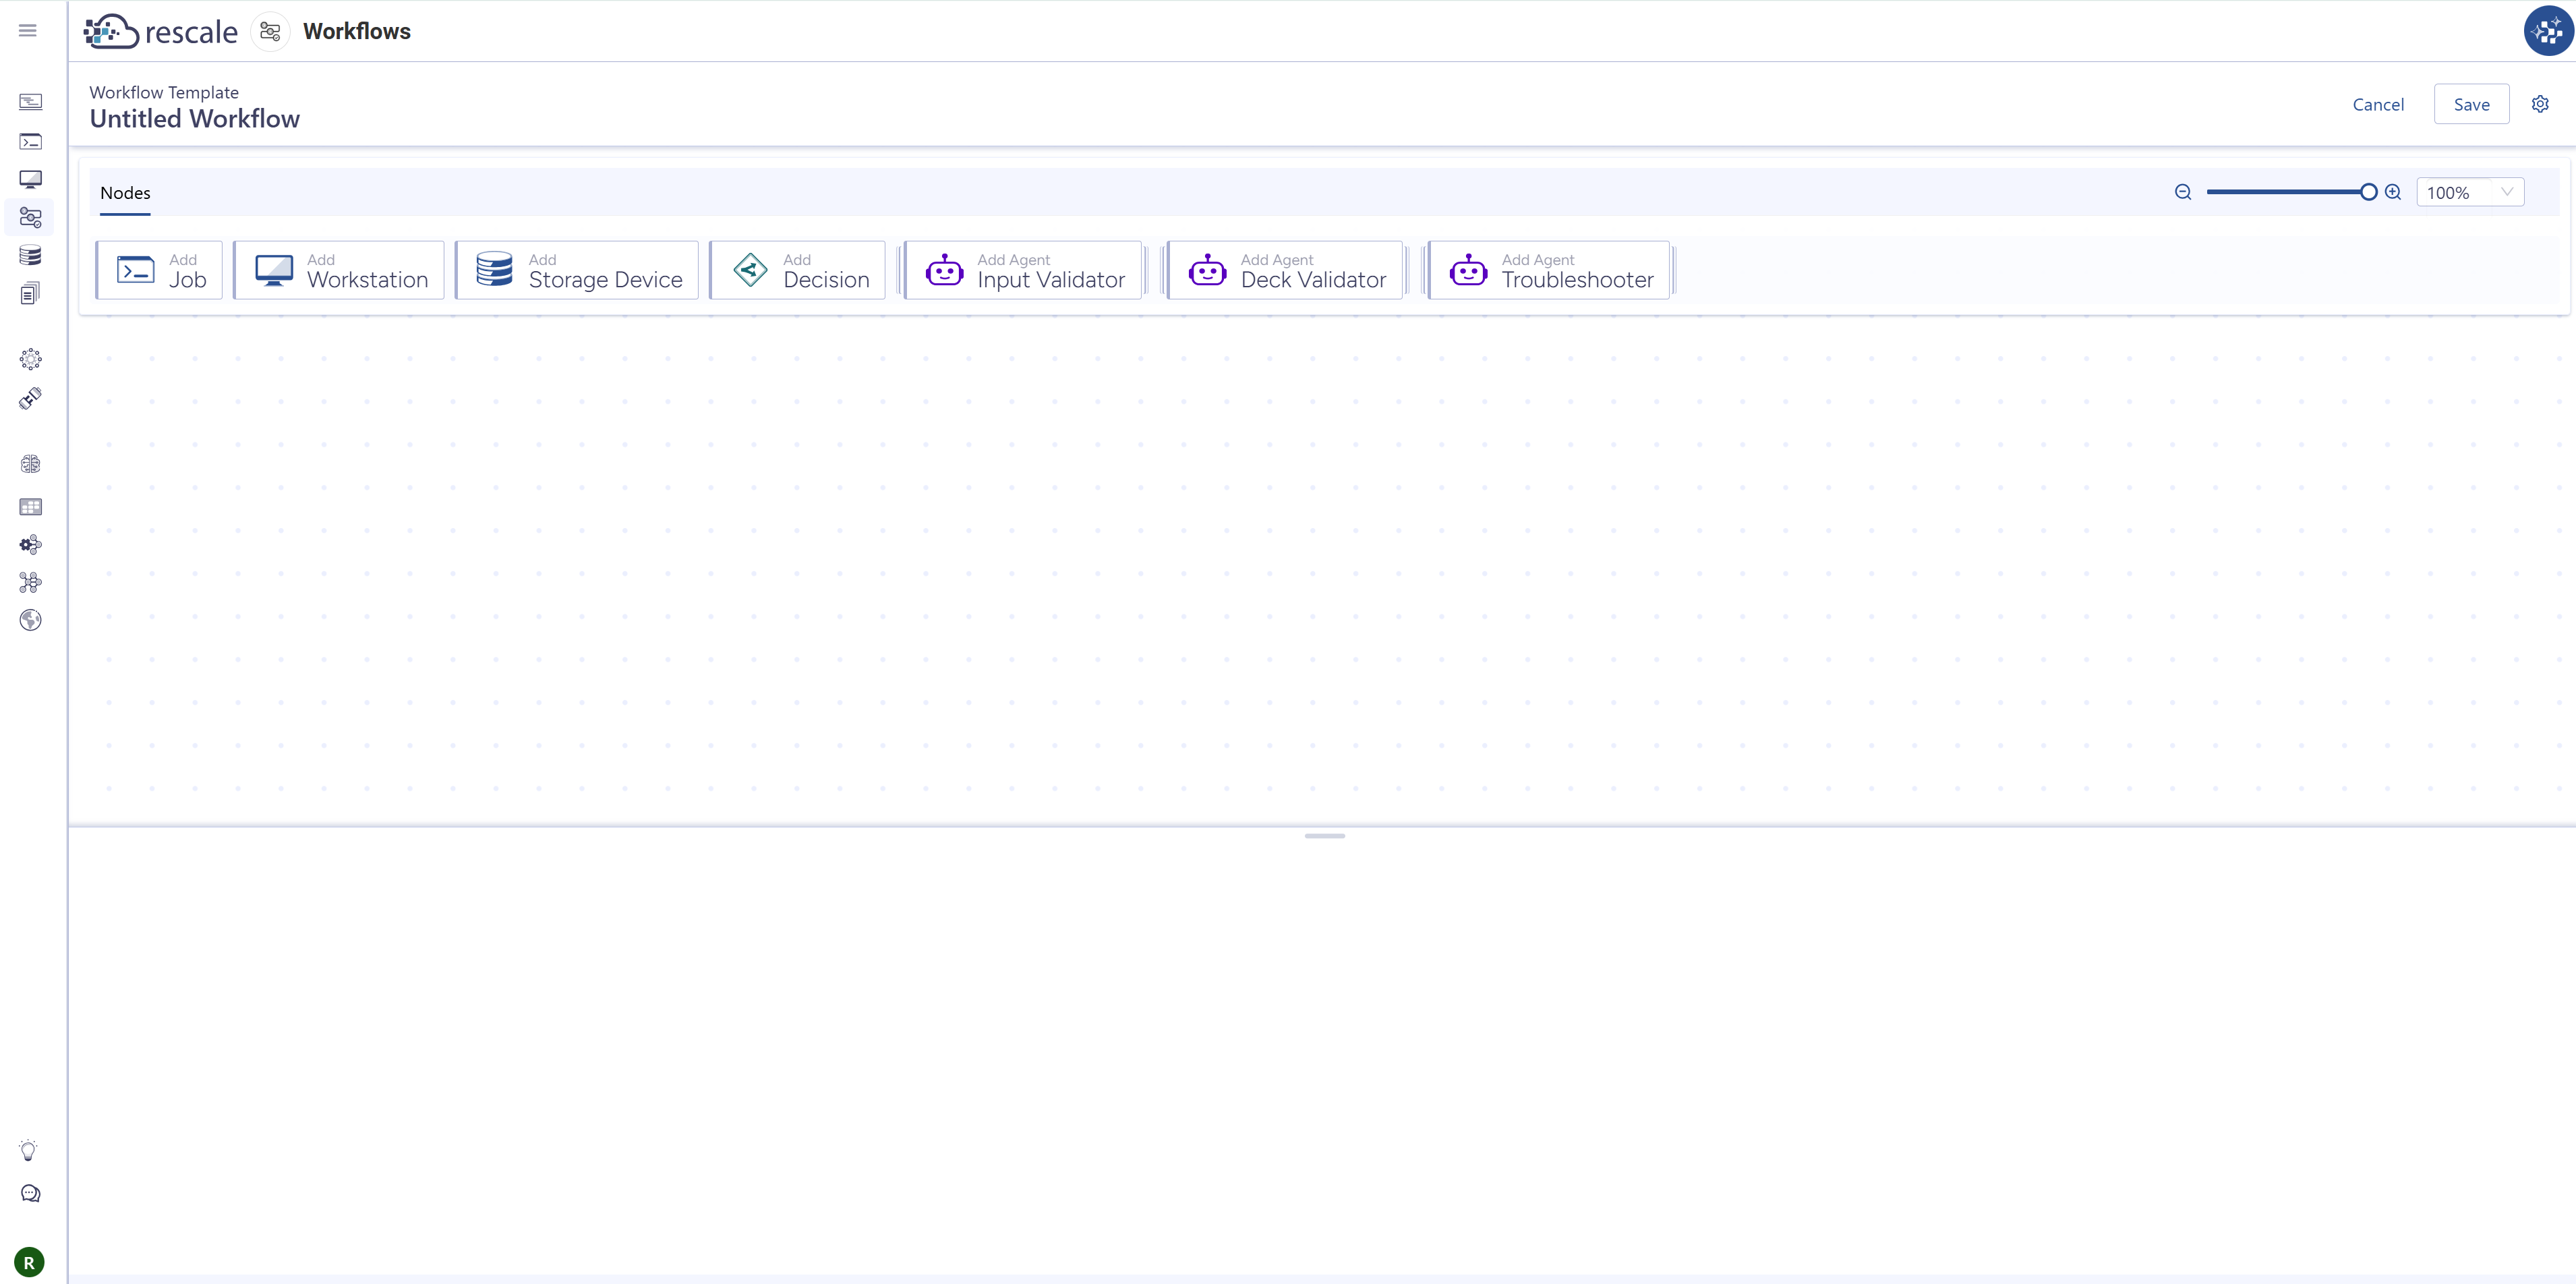
- Click New Workflow and + Create New Template to open the canvas for building a workflow template.
Add nodes to the canvas
The canvas is a drag-and-drop workspace where you compose your pipeline from a palette of node types. To run a workflow template, you need at least one node.
- In the node palette, drag a node type onto the canvas. Available node types are:
- Job — Runs a simulation or compute task on Rescale hardware
- Workstation — Launches an interactive workstation session for pre- or post-processing or other interactive tasks
- Storage Device — Mounts a persistent shared storage volume accessible to all connected nodes
- Decision — Evaluates a condition and routes execution to one of two downstream branches
- Agent — Connects a pre-built AI agent into the pipeline. The palette offers Input Validator, Deck Validator and Troubleshooter
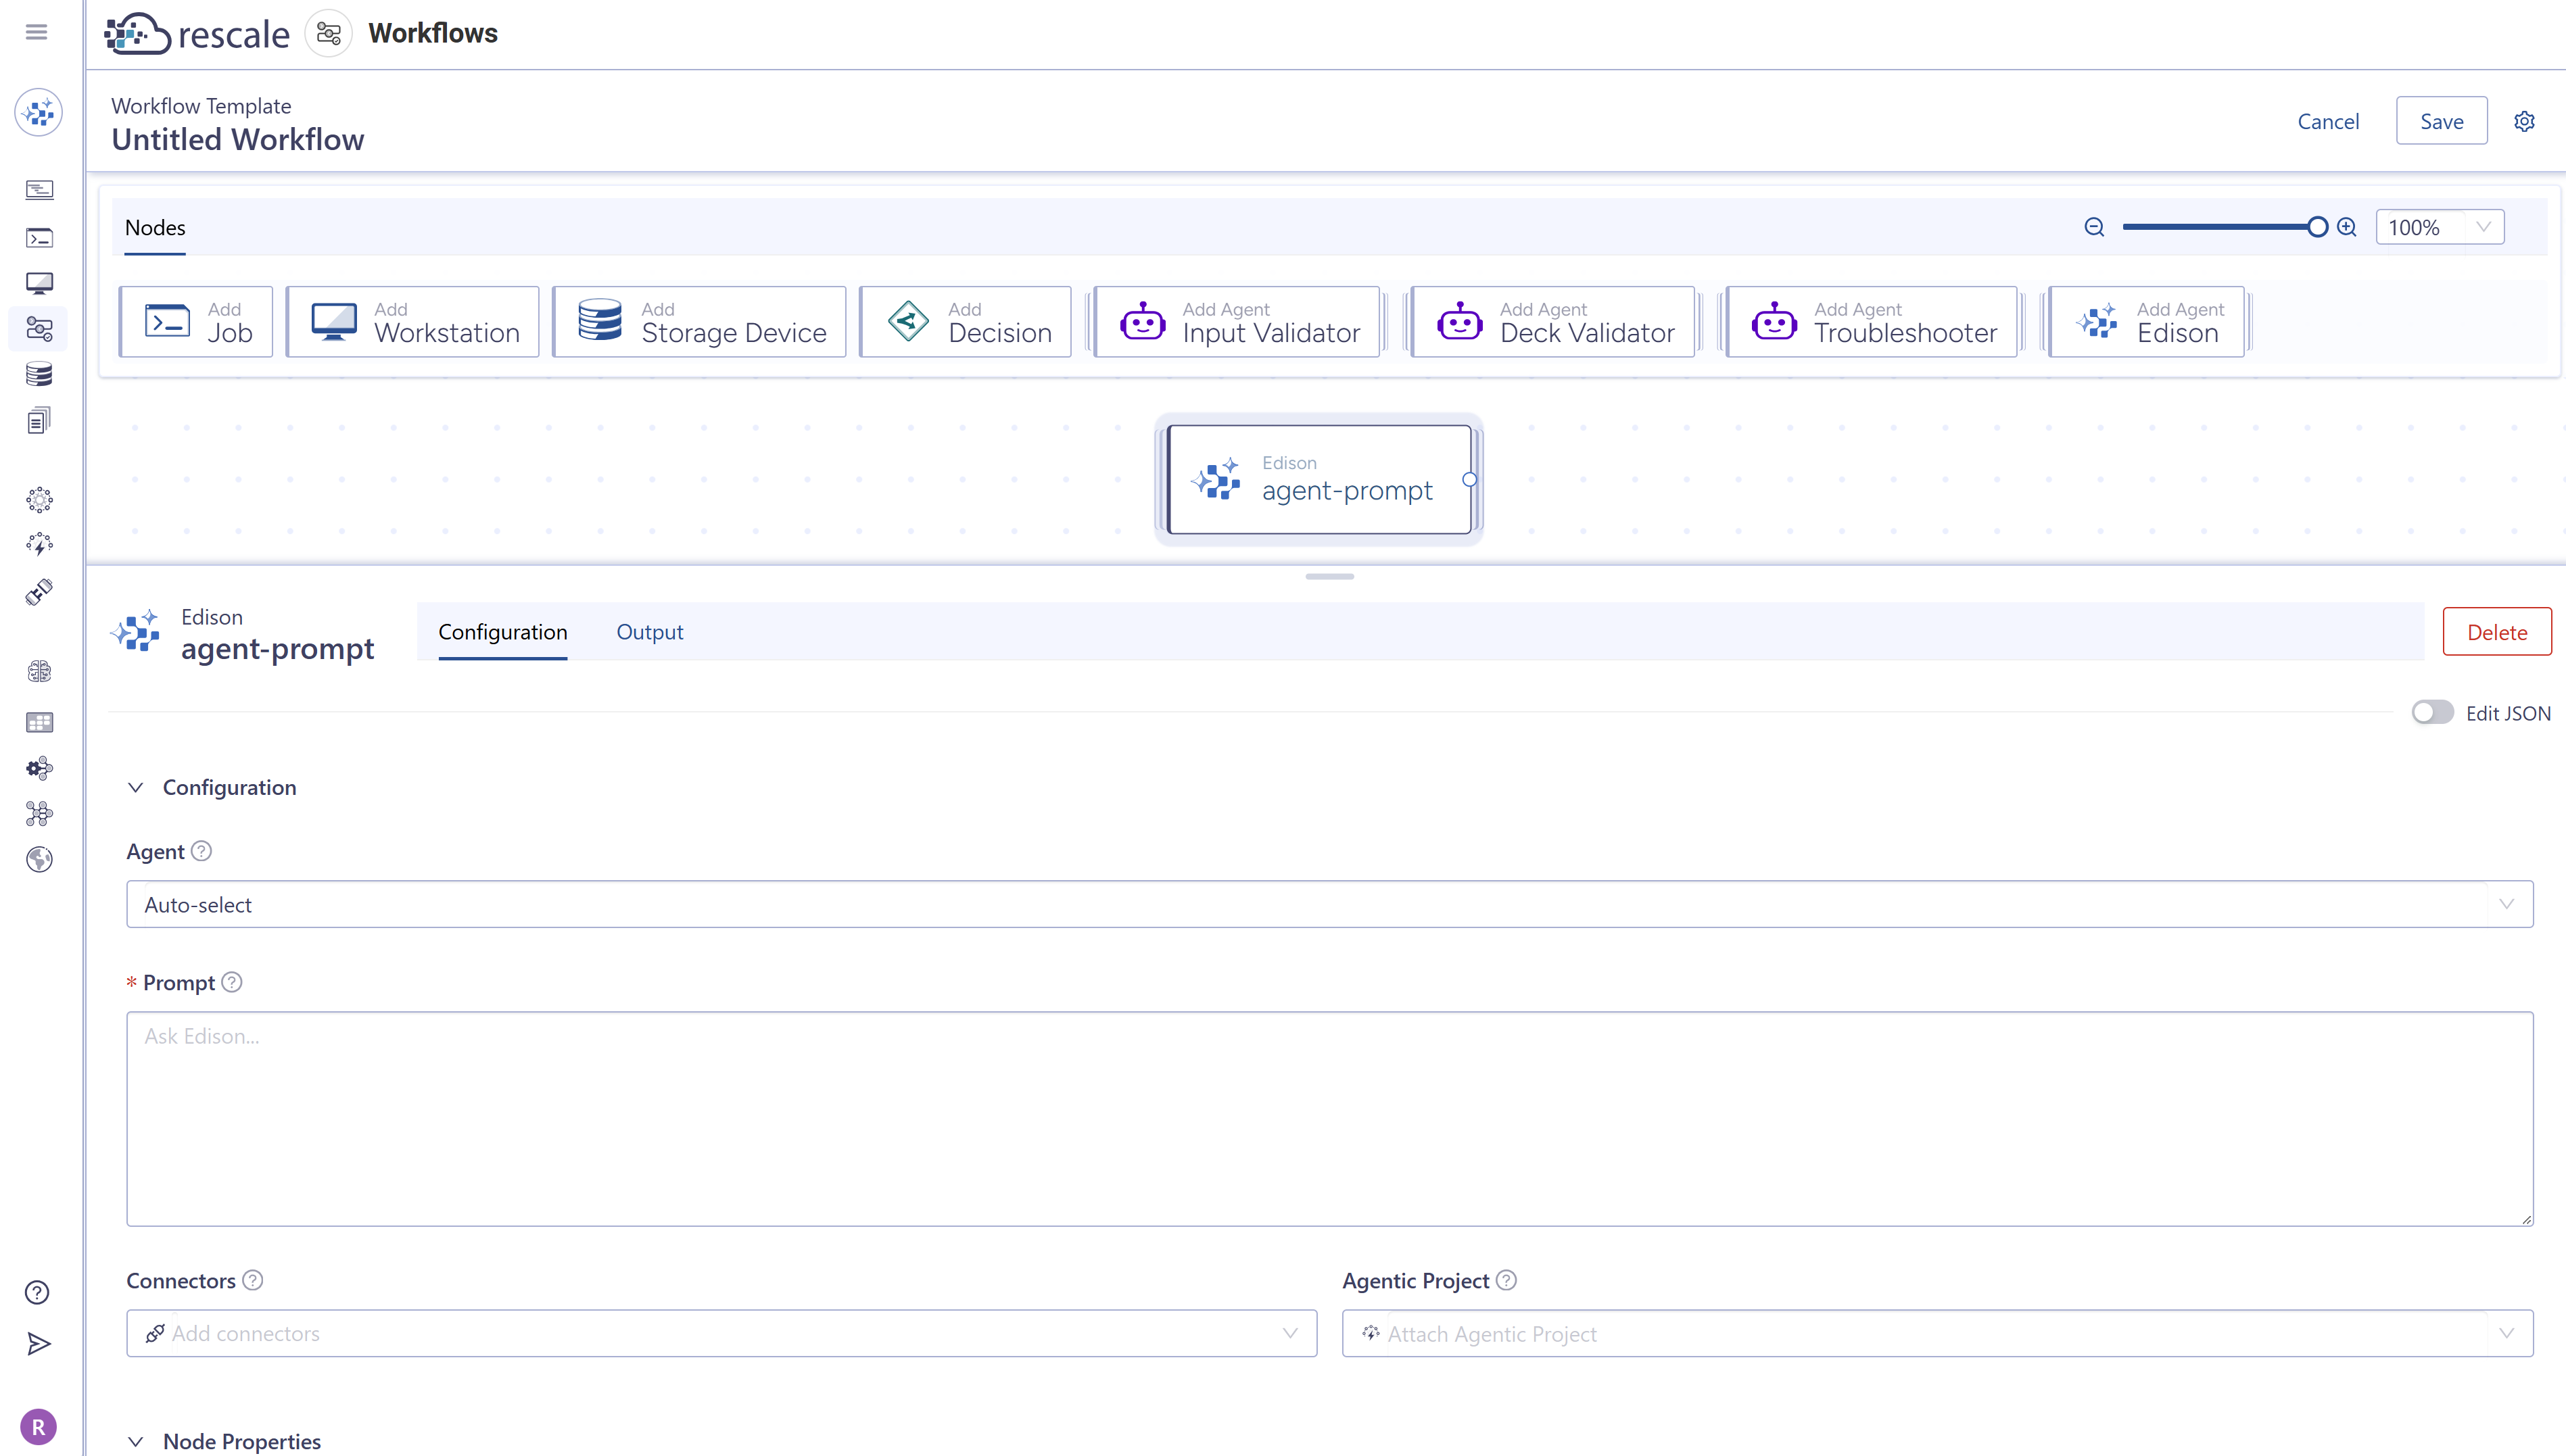
- Edison — Runs a prompt you write yourself, or hands the prompt to an agent it picks for you
-
Select the node on the canvas. Its configuration form opens in the bottom panel.
-
Fill in the node configuration (software, hardware, commands, and other settings) the same way you would configure a standalone job or workstation on Rescale.
Tip: To have all nodes share the same storage volume, add a Storage Device node first and connect it to your downstream nodes.
Connect nodes
Connections define execution order. A downstream node does not start until all nodes it depends on have completed.
- Hover over the edge of the node you want to run first. A connection handle appears.
- Click and drag from the handle to the next node in your pipeline.
- Release to create the connection. Repeat for each step in sequence.
To create parallel branches, connect one upstream node to multiple downstream nodes. All of those nodes start simultaneously when the upstream node completes.
Tip: To delete a previously defined connection, select the connection and use the Backspace key.
Transfer files between nodes
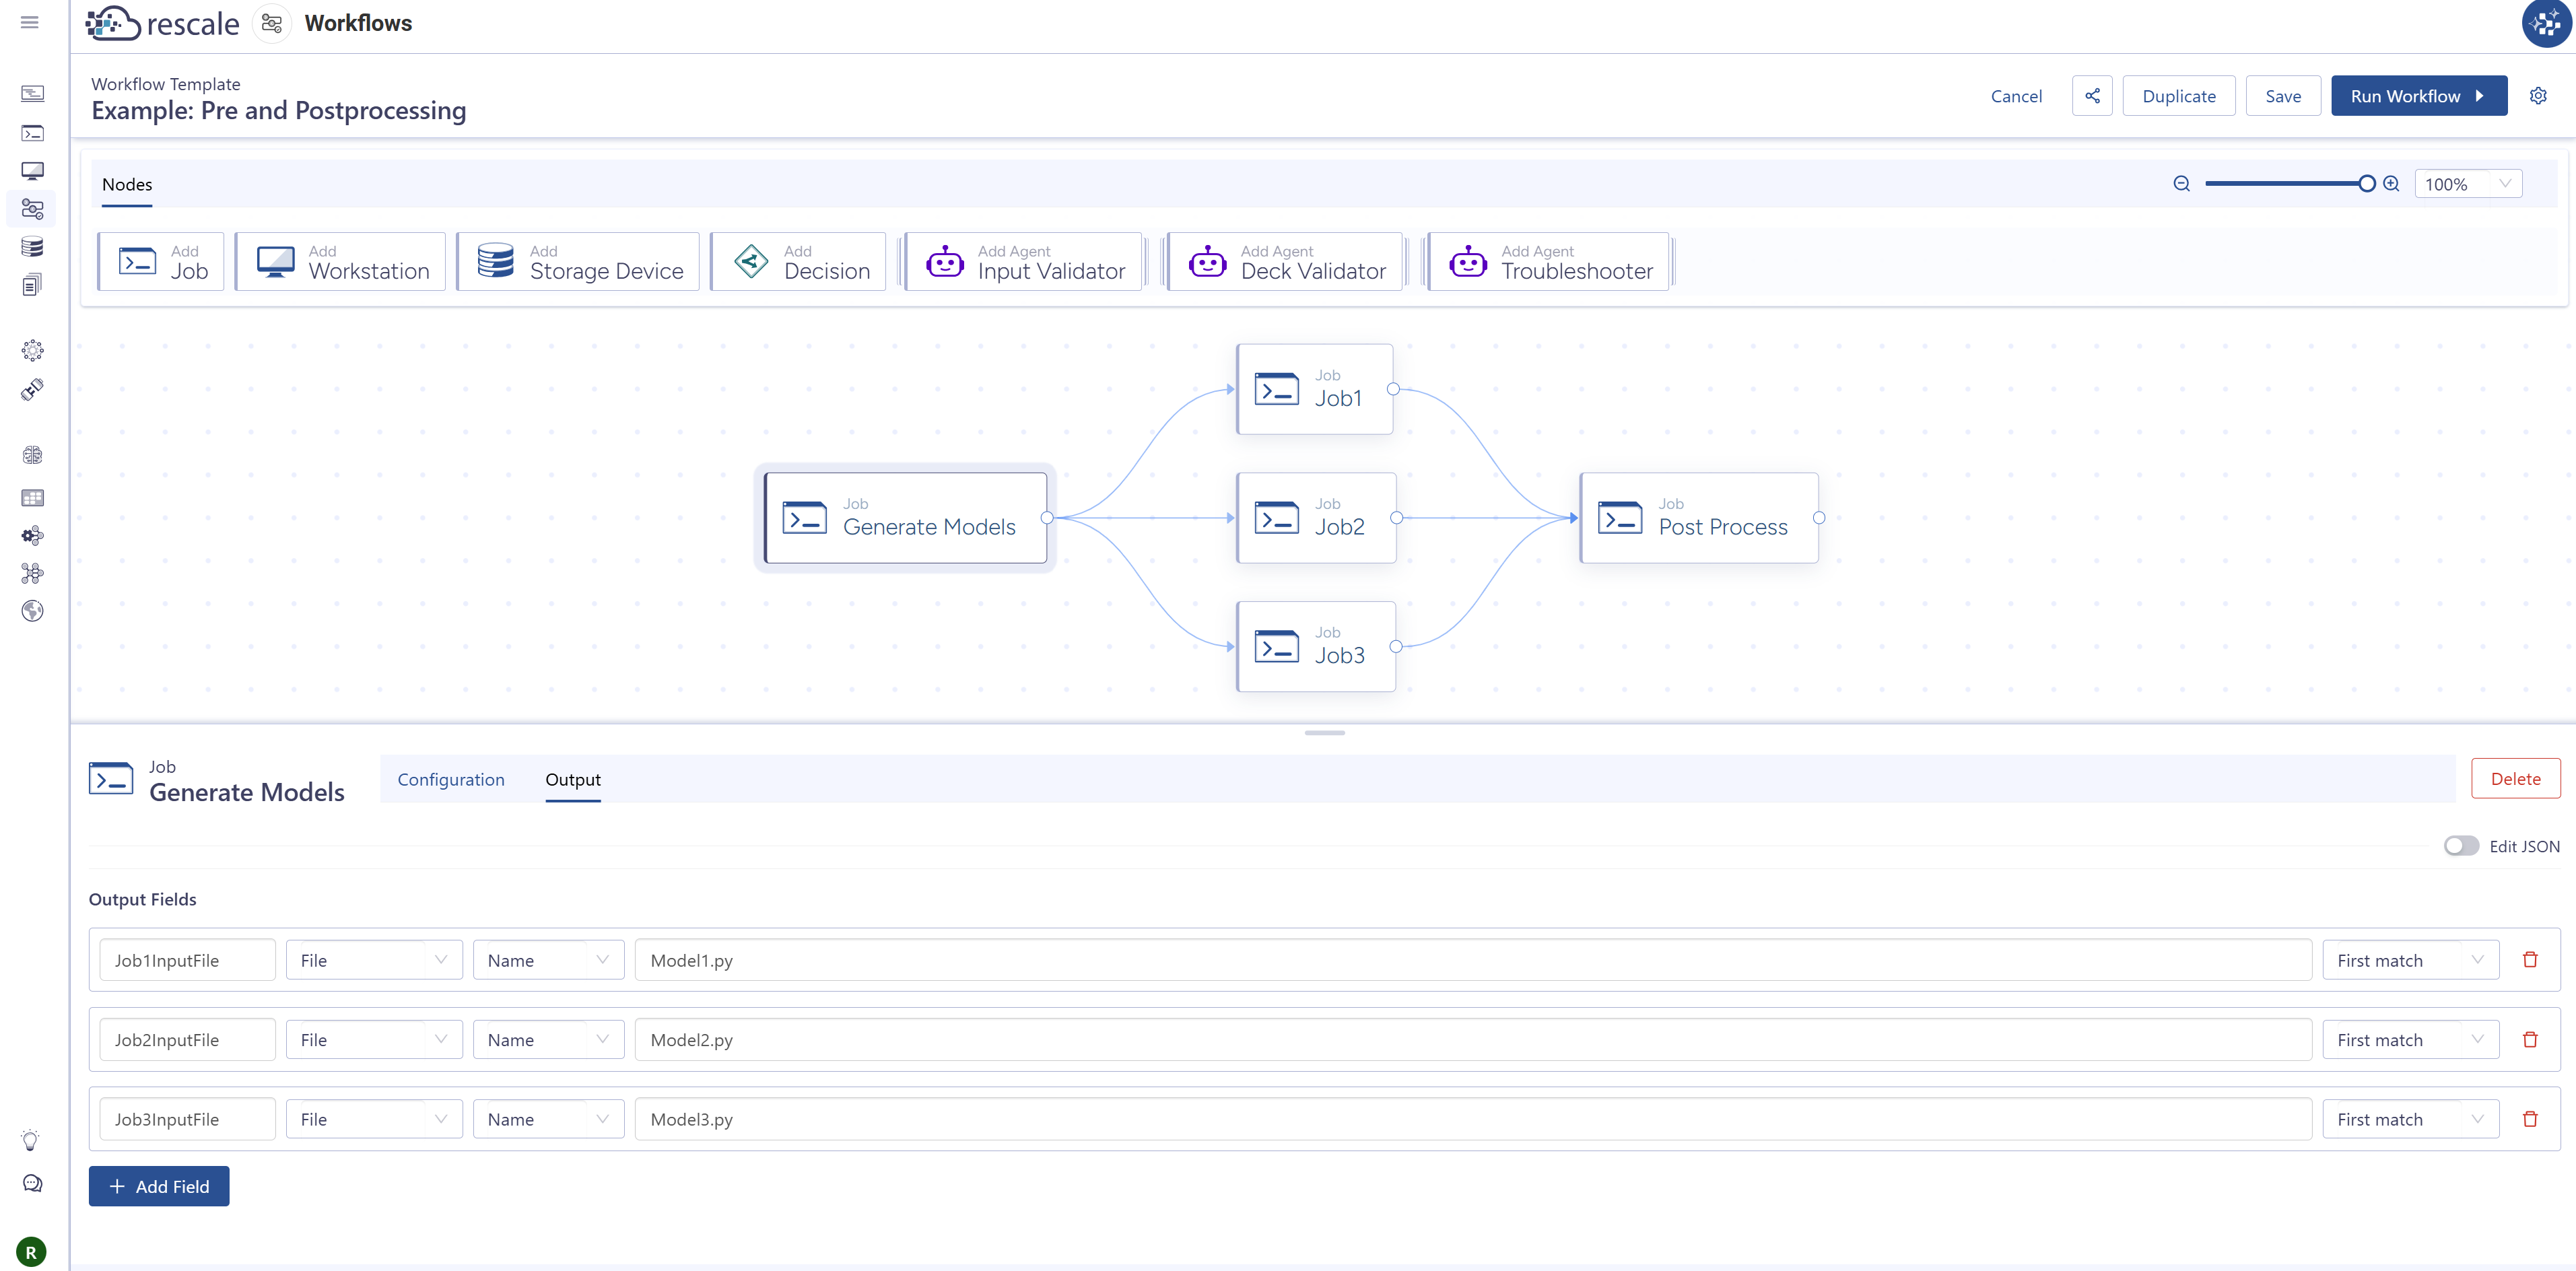
When your workflow needs to pass specific output files from one node to another, use the Output Field feature to explicitly define which files to transfer.
How file transfer works
- On the upstream node (producing files):
- In the node configuration, click the Output tab
- Click Add Field
- Enter a name for this output (e.g., "mesh_file", "results_csv", "post_processed_data")
- Specify the file extension, name, or path that this node will produce (e.g.,
output/mesh.msh,results/*.csv). Alternately you can specify that an entire folder be transferred by specifing the folder name or path.
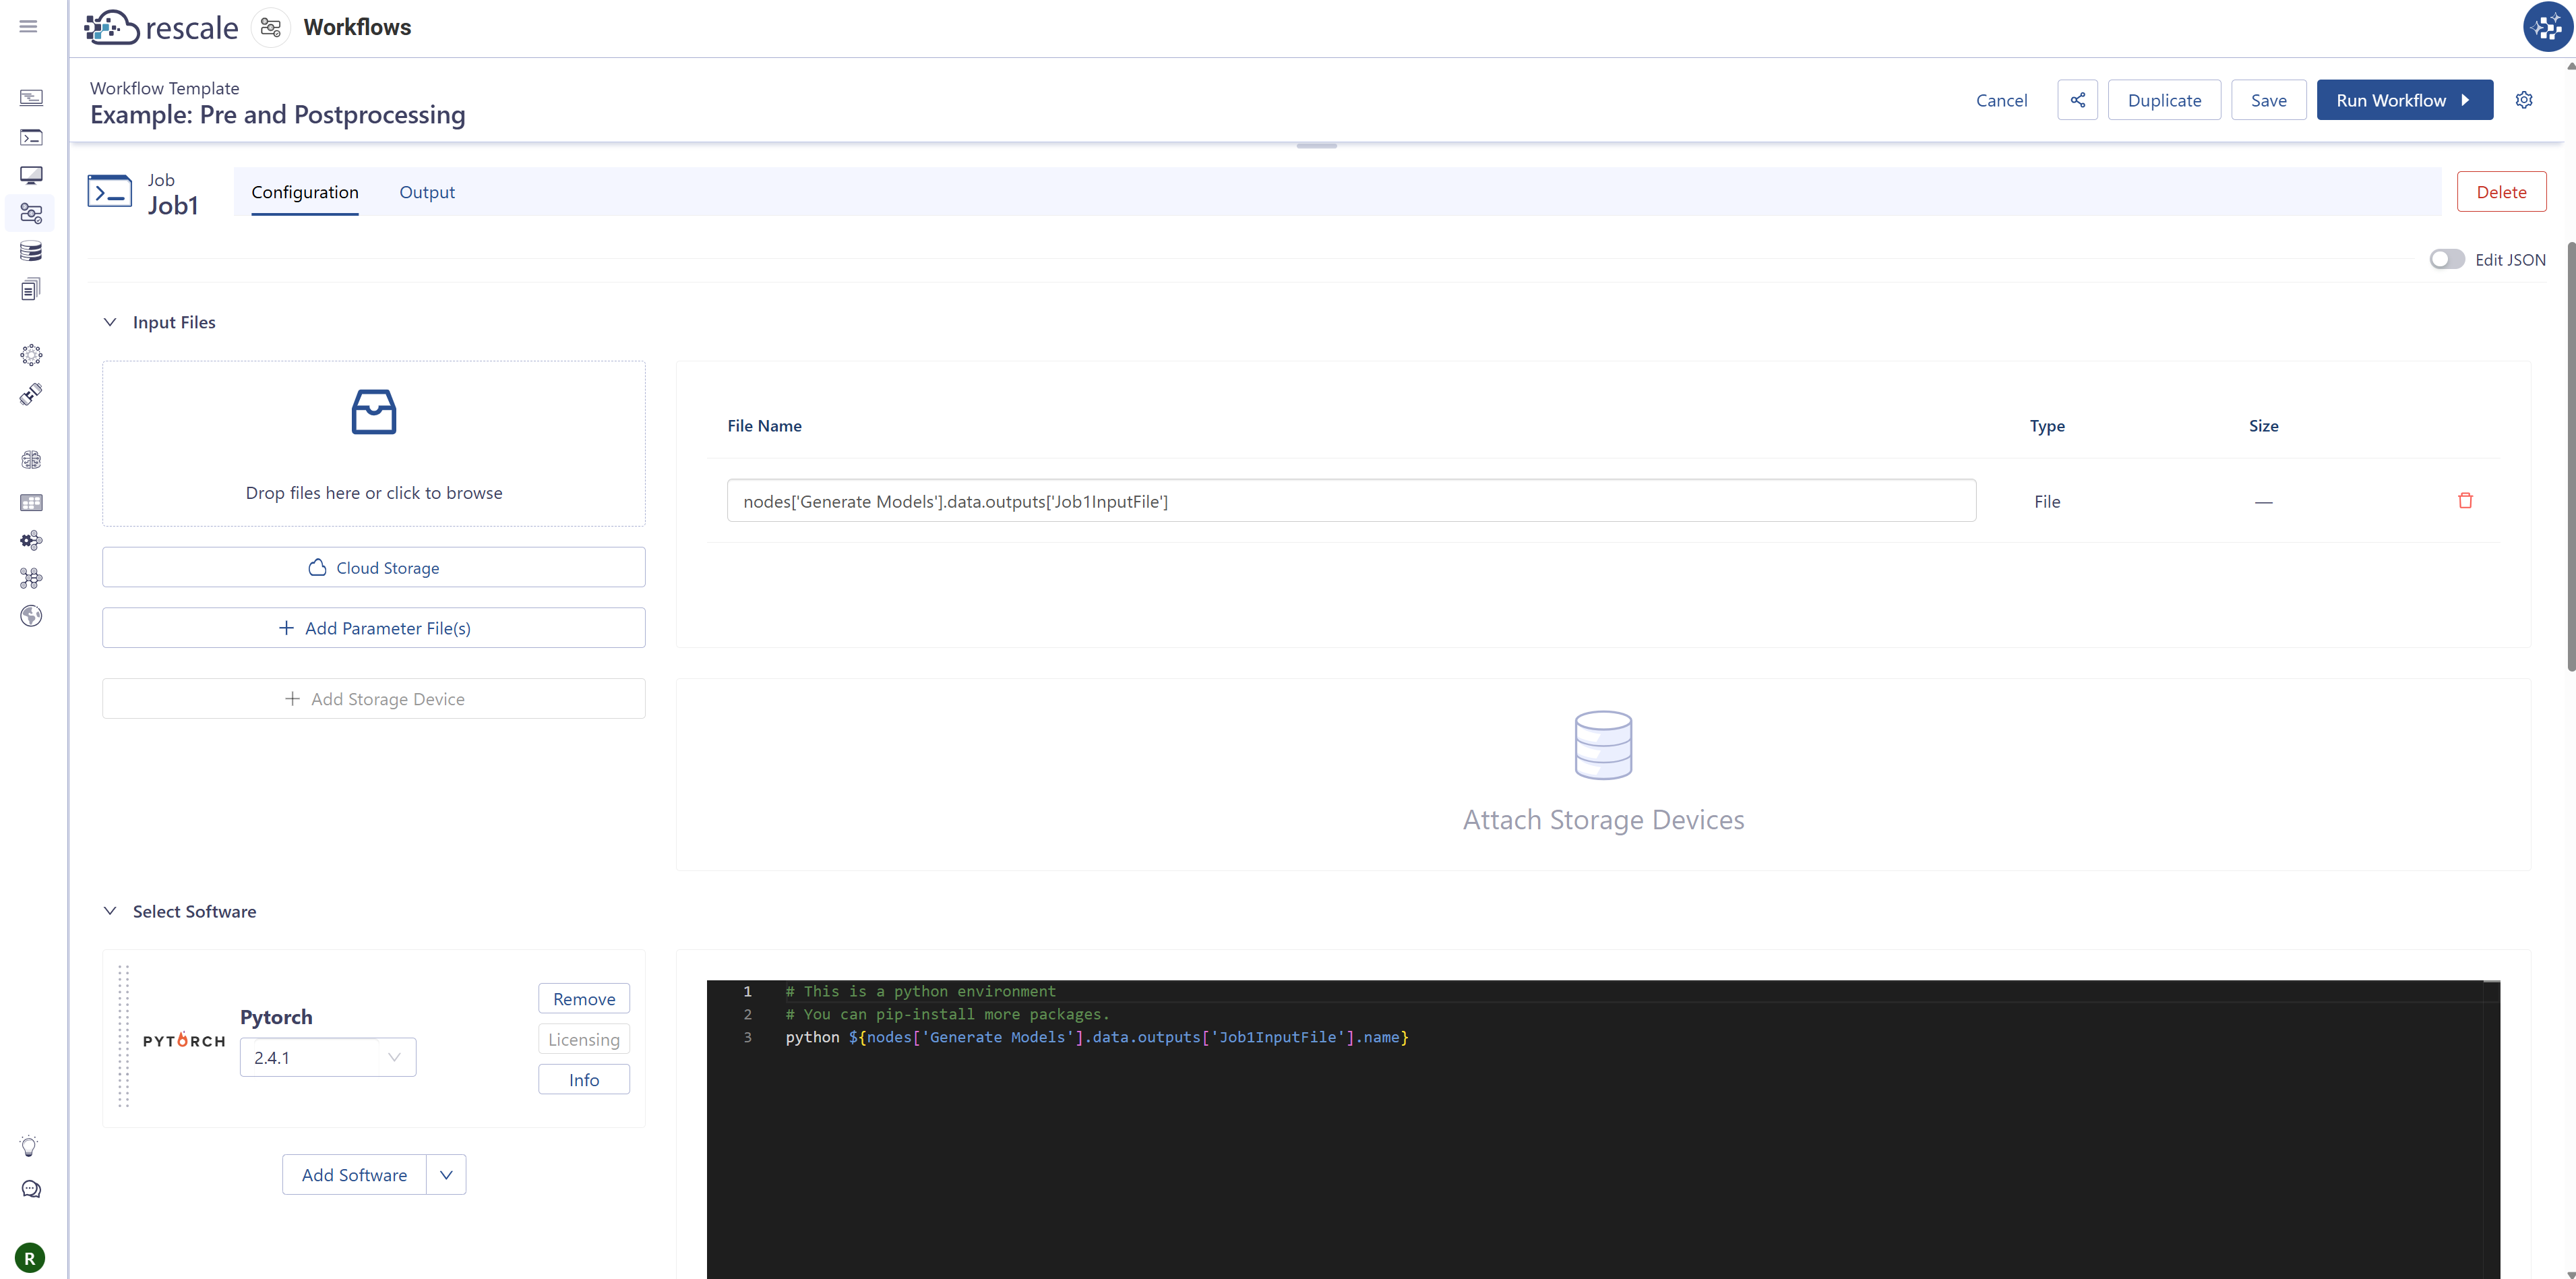
- On the downstream node (consuming files):
- In the node configuration for Input Files, Add Parameter Files and select the Output Field created in the upstream node
- You can specify the name of the Output Field in the software command line
- The files will be automatically transferred when the upstream node completes
When to use Output Fields vs shared storage
- Output Fields: Best for explicitly passing specific files or folders between nodes (e.g., a mesh file from preprocessing to solver)
- Shared Storage: Best for general file sharing where all nodes need to share the same storage volume.
You can use both methods together in the same workflow template.
Define workflow parameters
Workflow parameters let runners customize the workflow at execution time without modifying the template itself. Define them once; runners provide values when they submit a run.
-
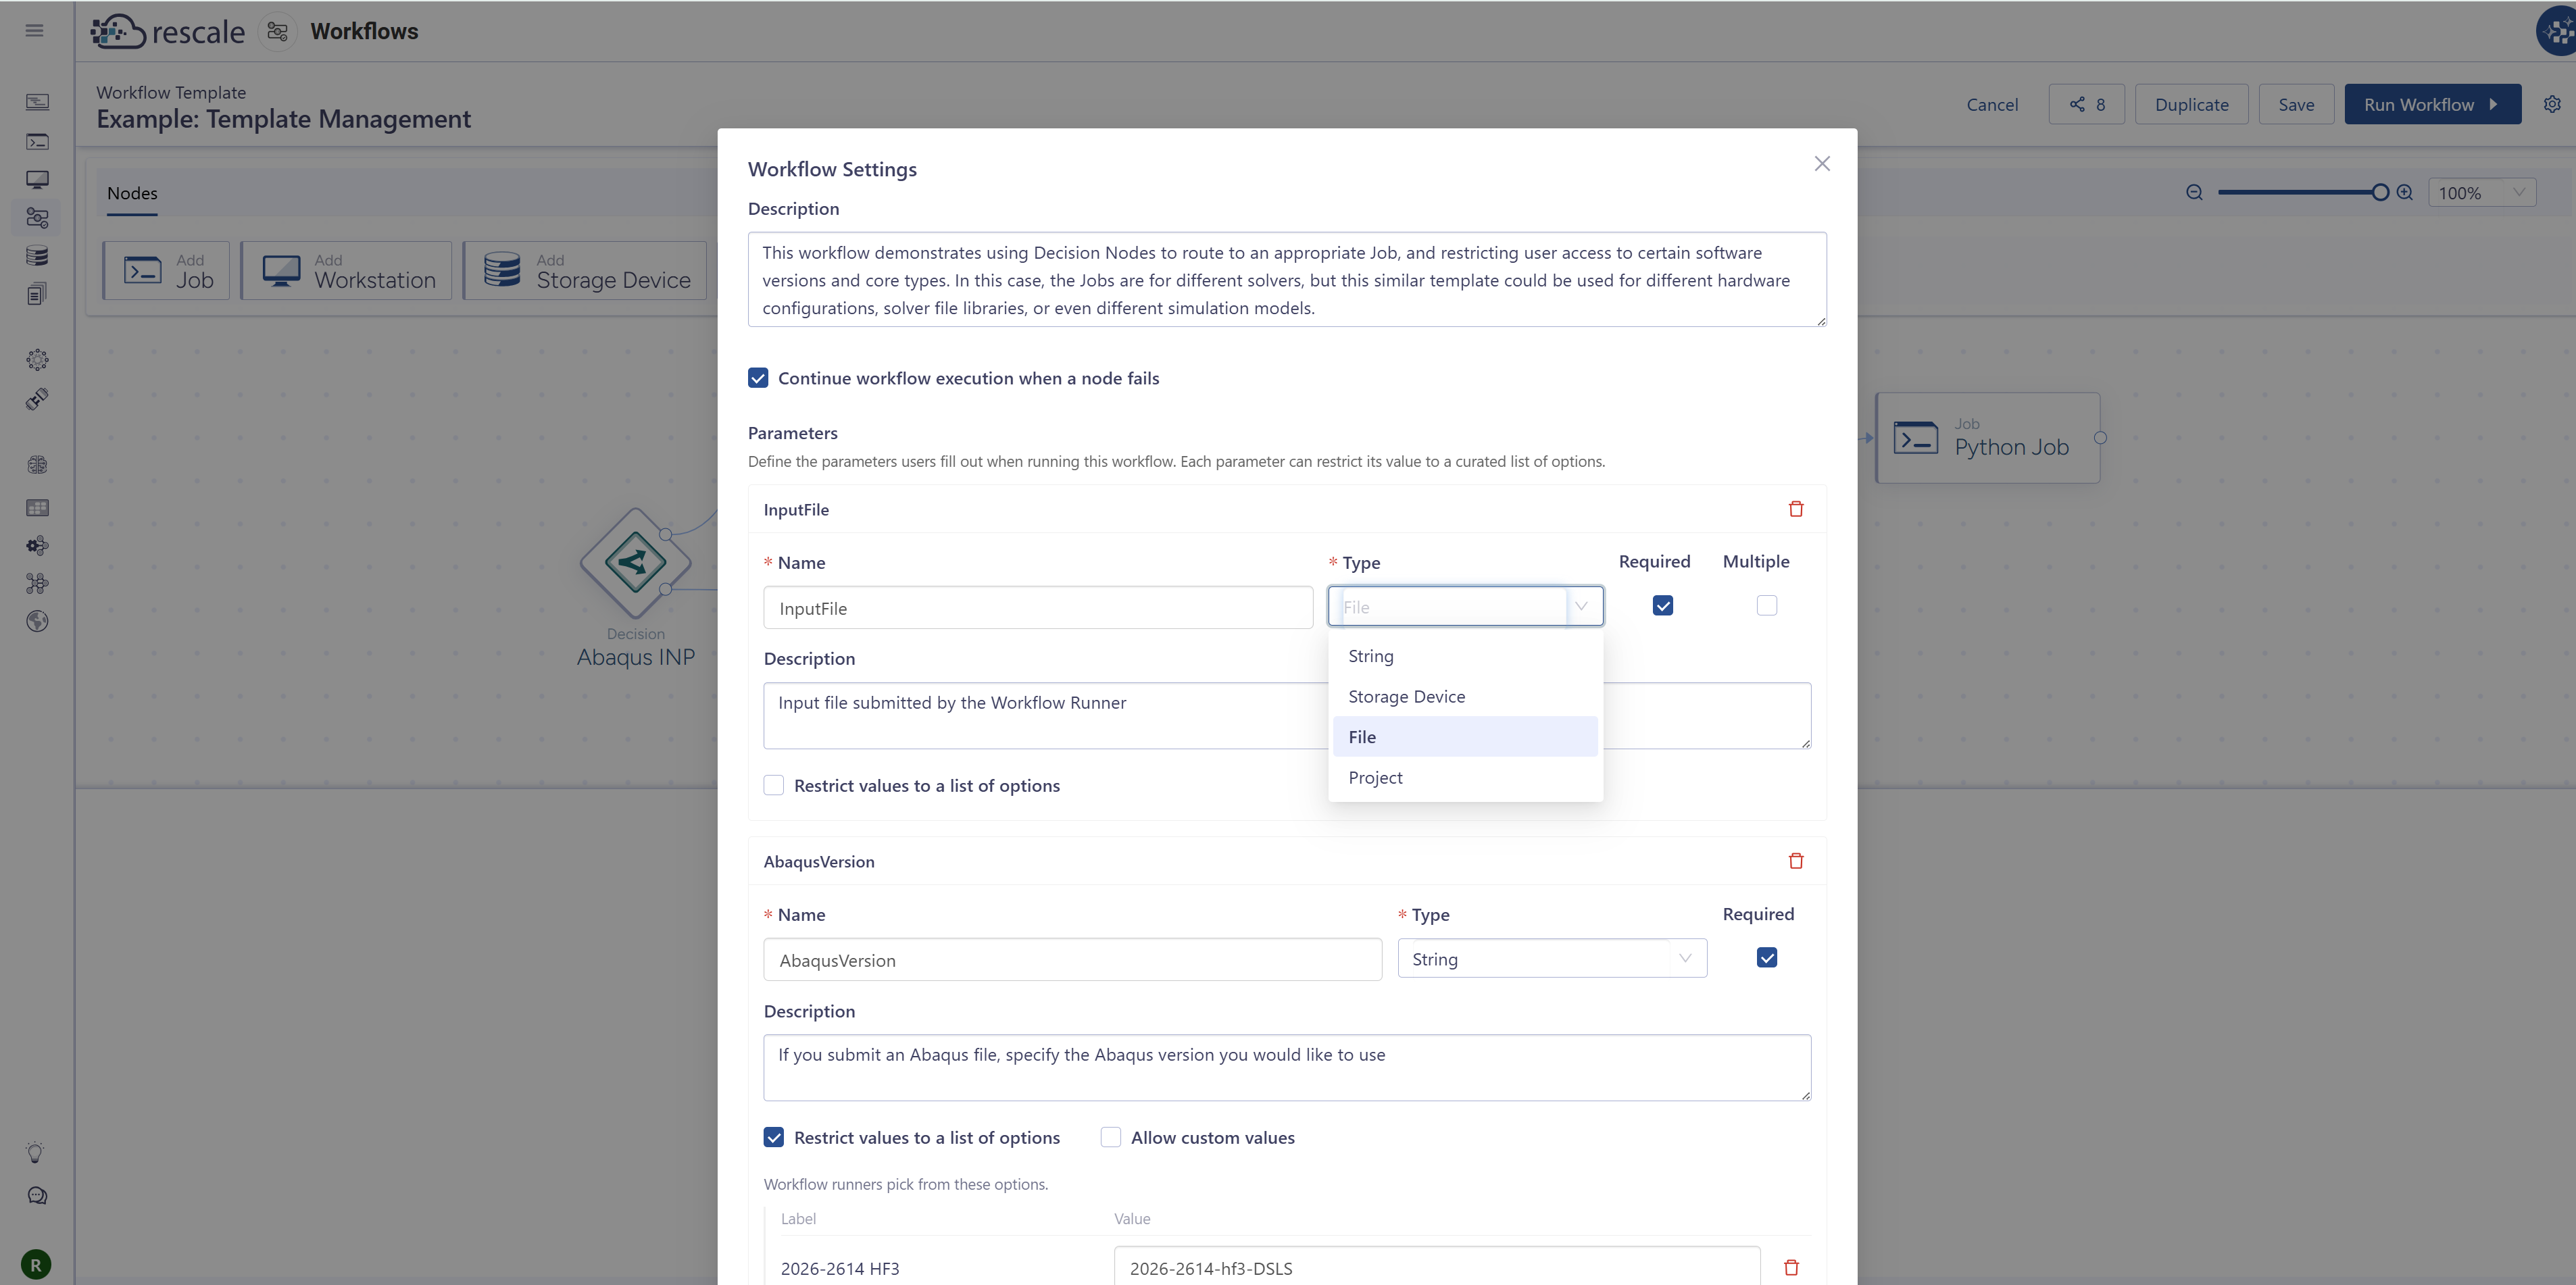
In the Parameters panel, click Add Parameter.
-
Enter a name and choose a type:
- String — A text value (for example, a solver flag, output directory name, or analysis label)
- File — Prompts the runner to upload a file or select one from existing cloud storage
- Storage Device — Prompts the runner to select a running shared storage device; Rescale automatically attaches it to all nodes in the workflow
- Project - Assign a project to the workflow runs for tracking
-
Set the parameter as Required or Optional.
-
To use the parameter inside a node's configuration, insert the following reference anywhere in that node's fields, for example in a job command or a file path:
${parameters["<parameter name>"]}
The Workflow Builder will often populate this reference automatically or from a dropdown when you're editing a node field.
Restrict parameter values to specific options (optional)
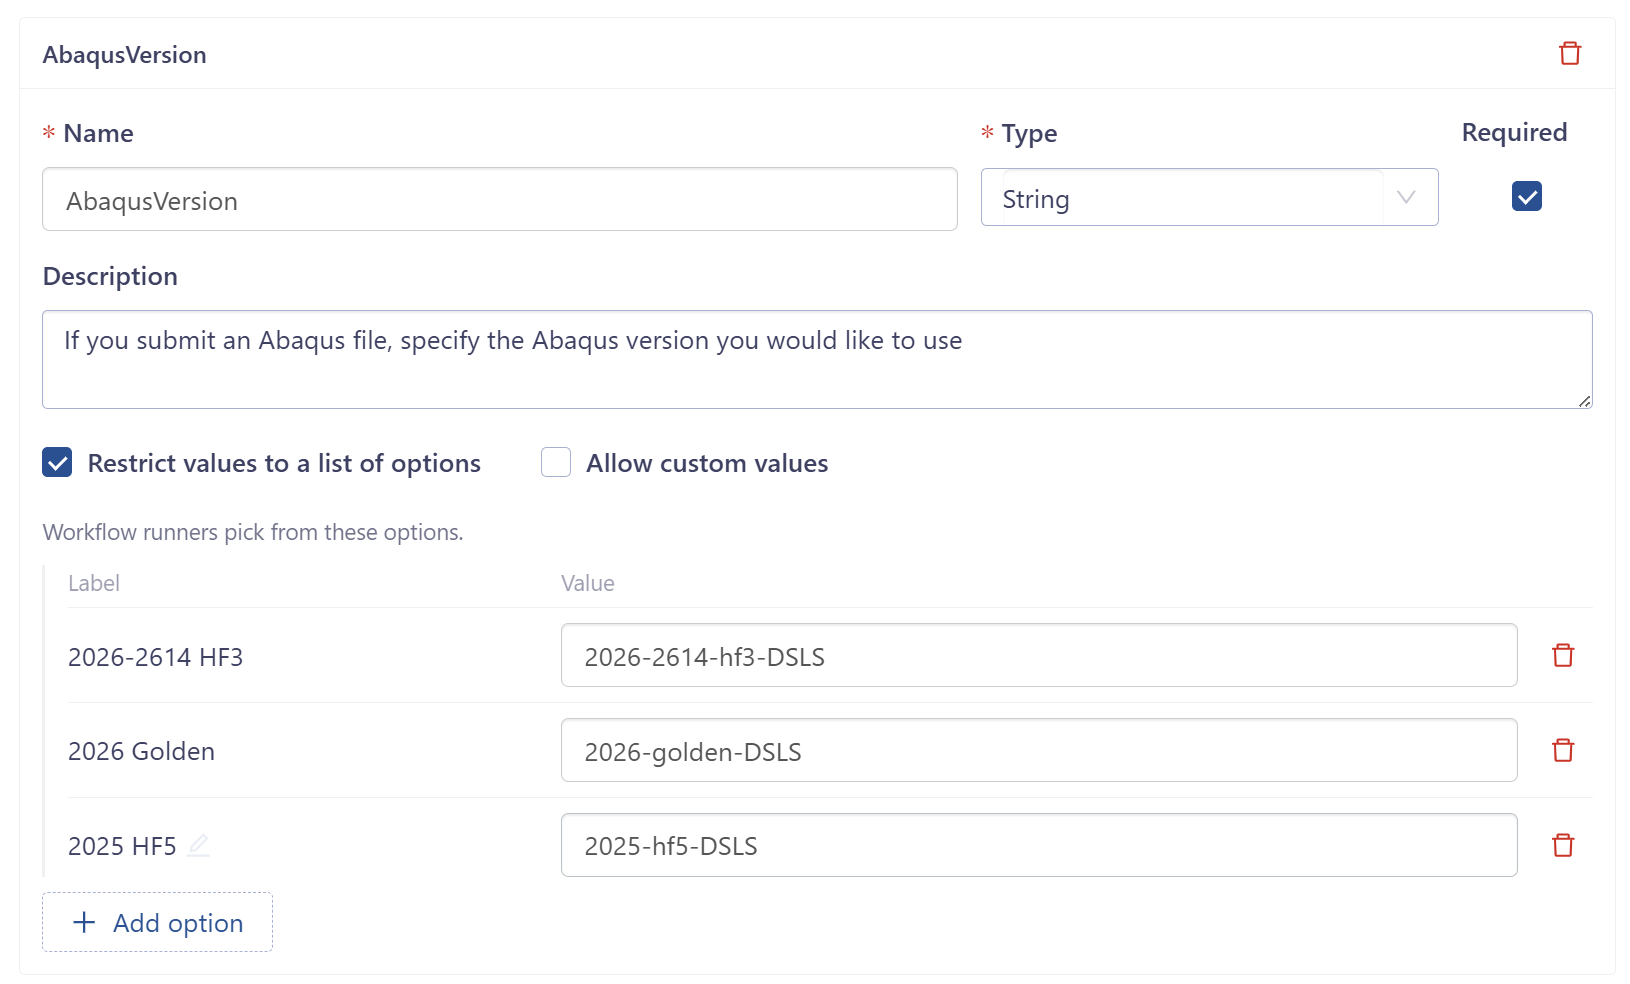
For String parameters, you can restrict the runner's input to a predefined list of options. This is useful when you want to ensure consistent values (for example, selecting between solver types, analysis modes, or hardware configurations) and prevent invalid inputs.
- When adding or editing a String parameter, check the box Restrict values to a list of options.
- For each allowed value, enter:
- Label — The display name the runner sees in the dropdown
- Value — The actual value substituted into the workflow at runtime
- Click Add option to add more choices.
- Optionally, check Allow custom values if runners should be able to enter their own value in addition to the predefined options.
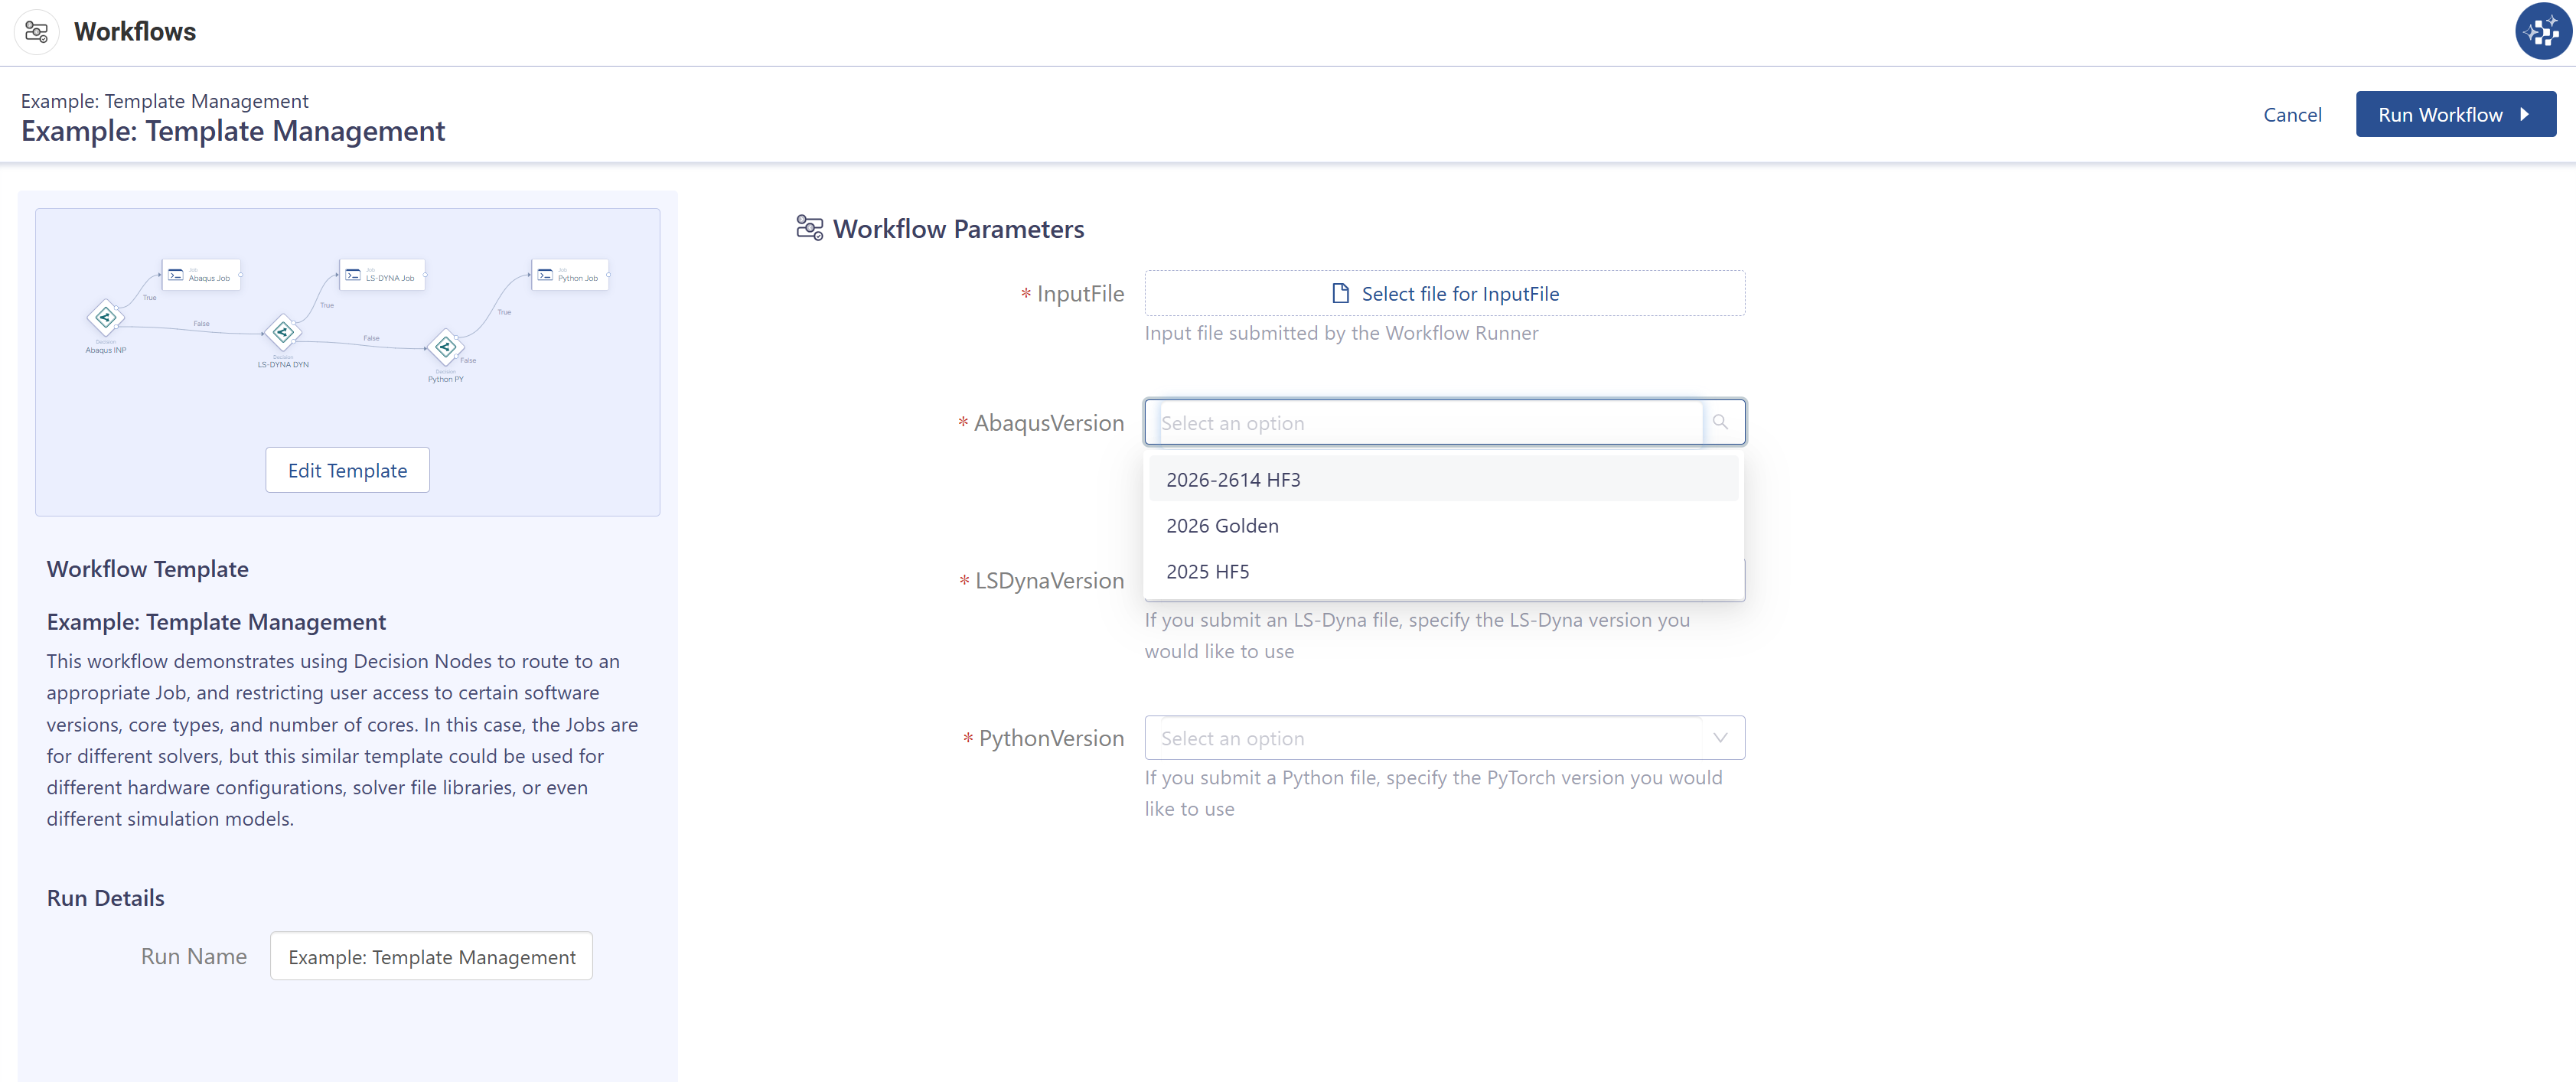
When a runner submits the workflow, the parameter appears as a dropdown with the options you defined:
Reference upstream node outputs (optional)
Dynamic value references let you pass outputs from one node directly into the configuration of a downstream node at runtime, for example using a completed job's resource ID as an input for the next step.
To reference the resource ID of an upstream node:
${nodes["<node name>"].data.execution.resource_id}
Insert this reference in any node configuration field where you want to use the upstream value. It resolves automatically when the workflow runs.
Configure workflow settings
Workflow-level settings control execution behavior across every node in the template. Open them by clicking the gear icon in the top-right corner of the template editor.
Concurrent nodes
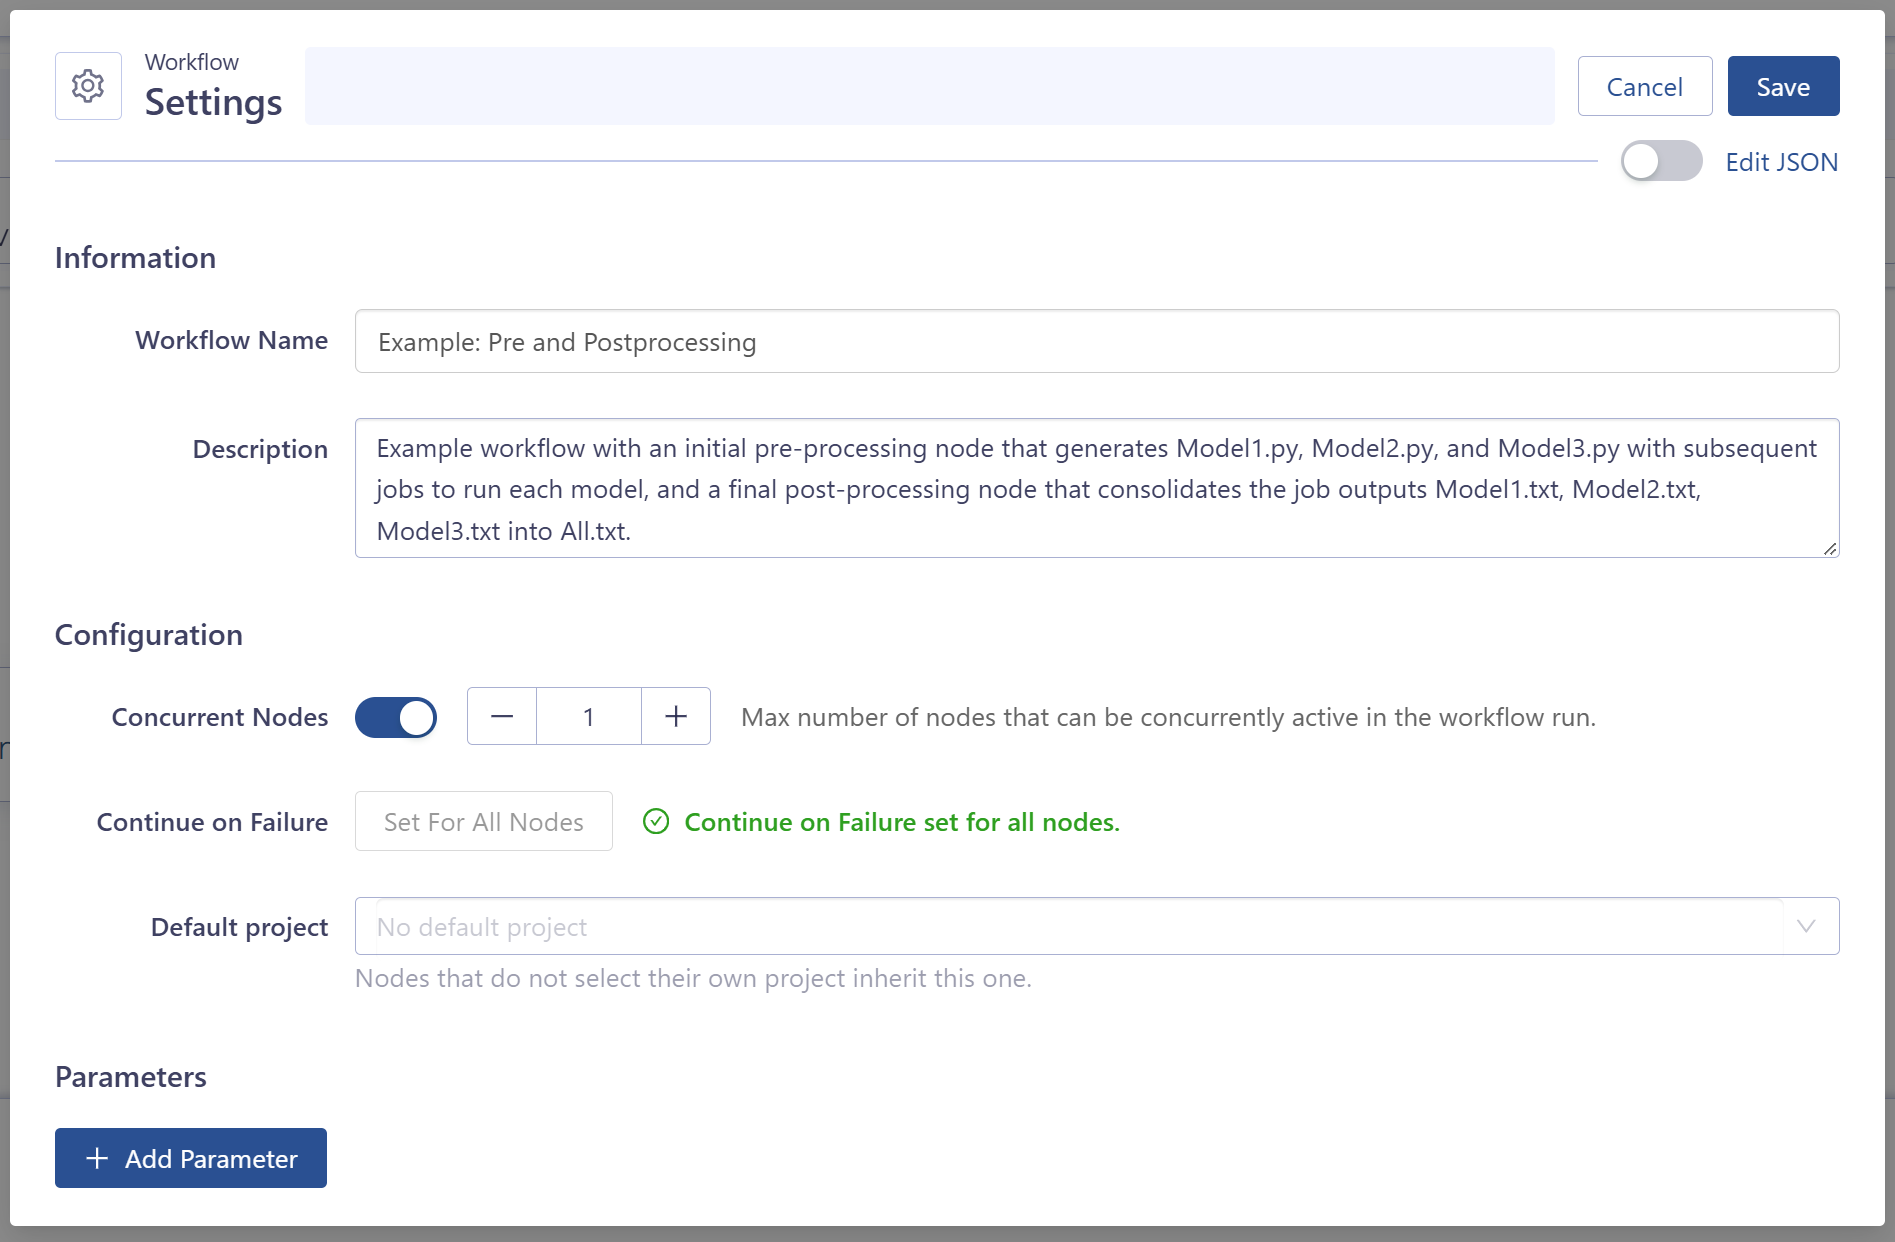
By default, every node whose dependencies are met runs at the same time. Capping that is useful when the nodes compete for something finite, most often a fixed pool of software licenses. Enable Concurrent Nodes and set the ceiling with the numeric stepper.
Once the limit is reached, further ready nodes wait in a queue until a running node completes. Nodes still execute in topological order, so an upstream node always runs before the nodes that depend on it.
- Click the gear icon to open Workflow Settings.
- Toggle Concurrent Nodes on.
- Set the number to the maximum you want active at once.
- Click Save.
Continue on failure (all nodes)
To let the workflow keep running independent branches whenever any node fails, click Set For All Nodes next to Continue on Failure in Workflow Settings. Rescale confirms with the message Continue on Failure set for all nodes.
This applies the setting to every node in one action. You can still override individual nodes afterwards, as described in the next section.
Configure node failure behavior
By default a node failure stops all downstream execution. Overriding it per node narrows the blast radius to that node's own dependents, so unrelated branches carry on.
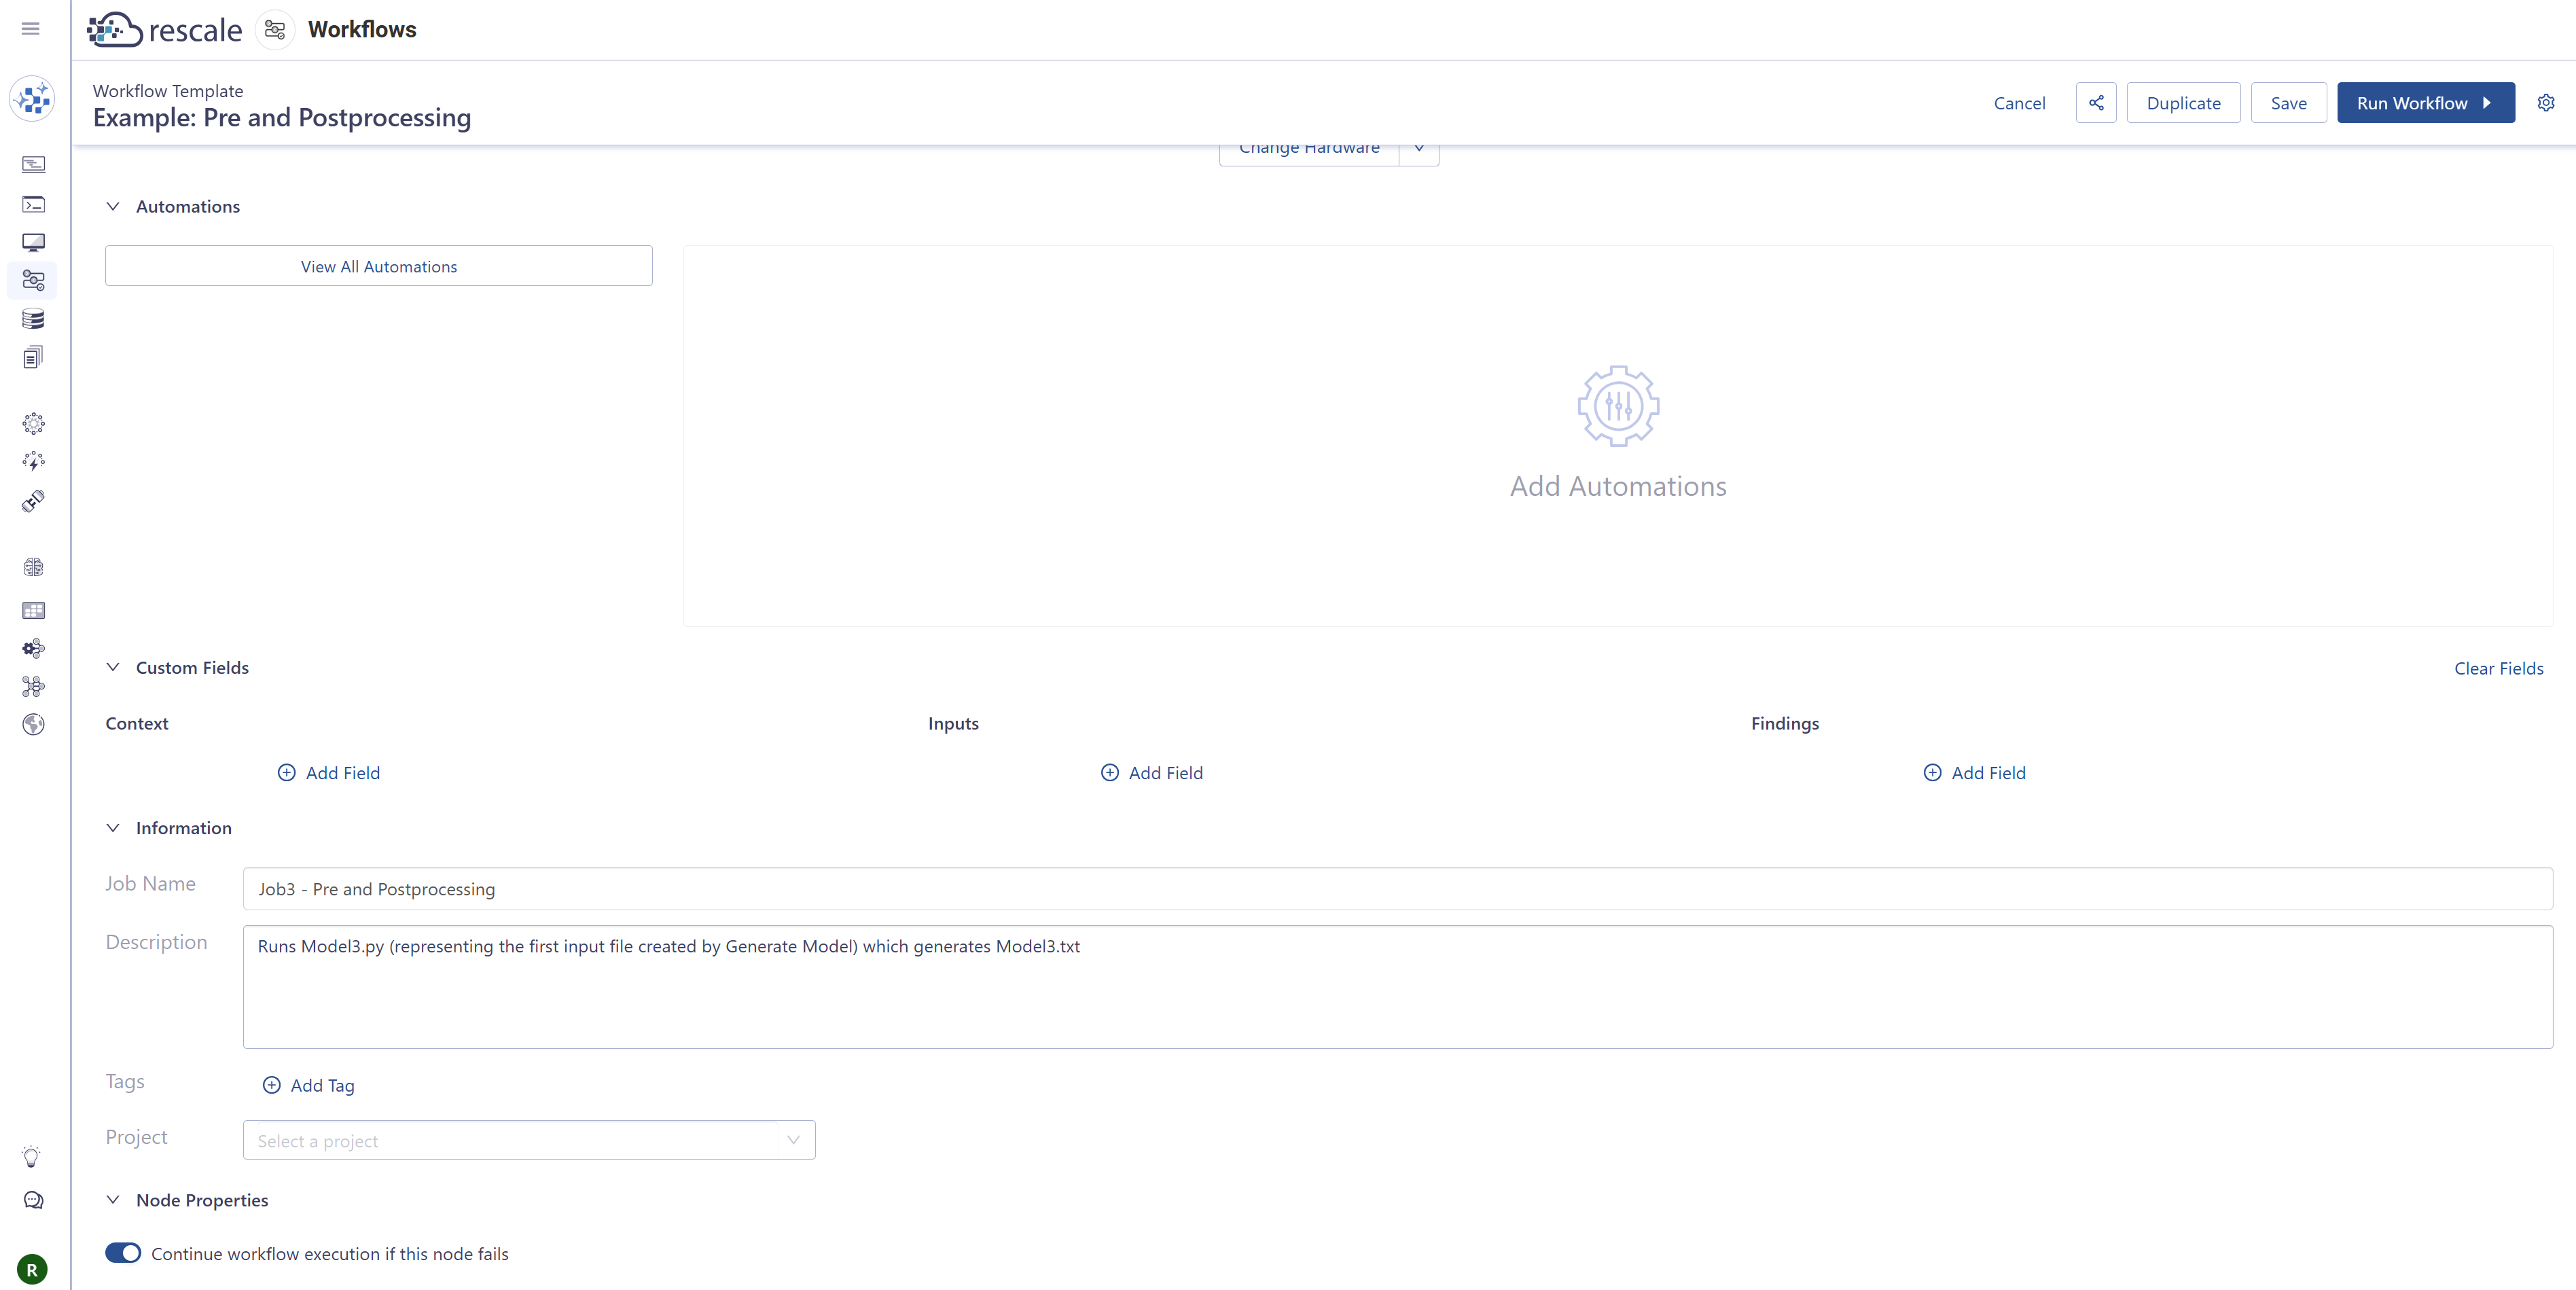
- Select a node on the canvas to open its configuration panel.
- Scroll to Node Properties at the bottom of the panel.
- Enable Continue workflow execution if this node fails.
With the setting on, a failure stops only the nodes downstream of it. Every branch that does not depend on the failed node keeps going, so the run computes everything it still can rather than discarding the whole attempt.
A Decision node failure always halts the workflow, whatever this setting says. Without a decision result the system has no way to tell which branch to take.
Save the workflow template
Click Save. Your template appears in the Workflows list and is ready to run or share.
Share the template (optional)
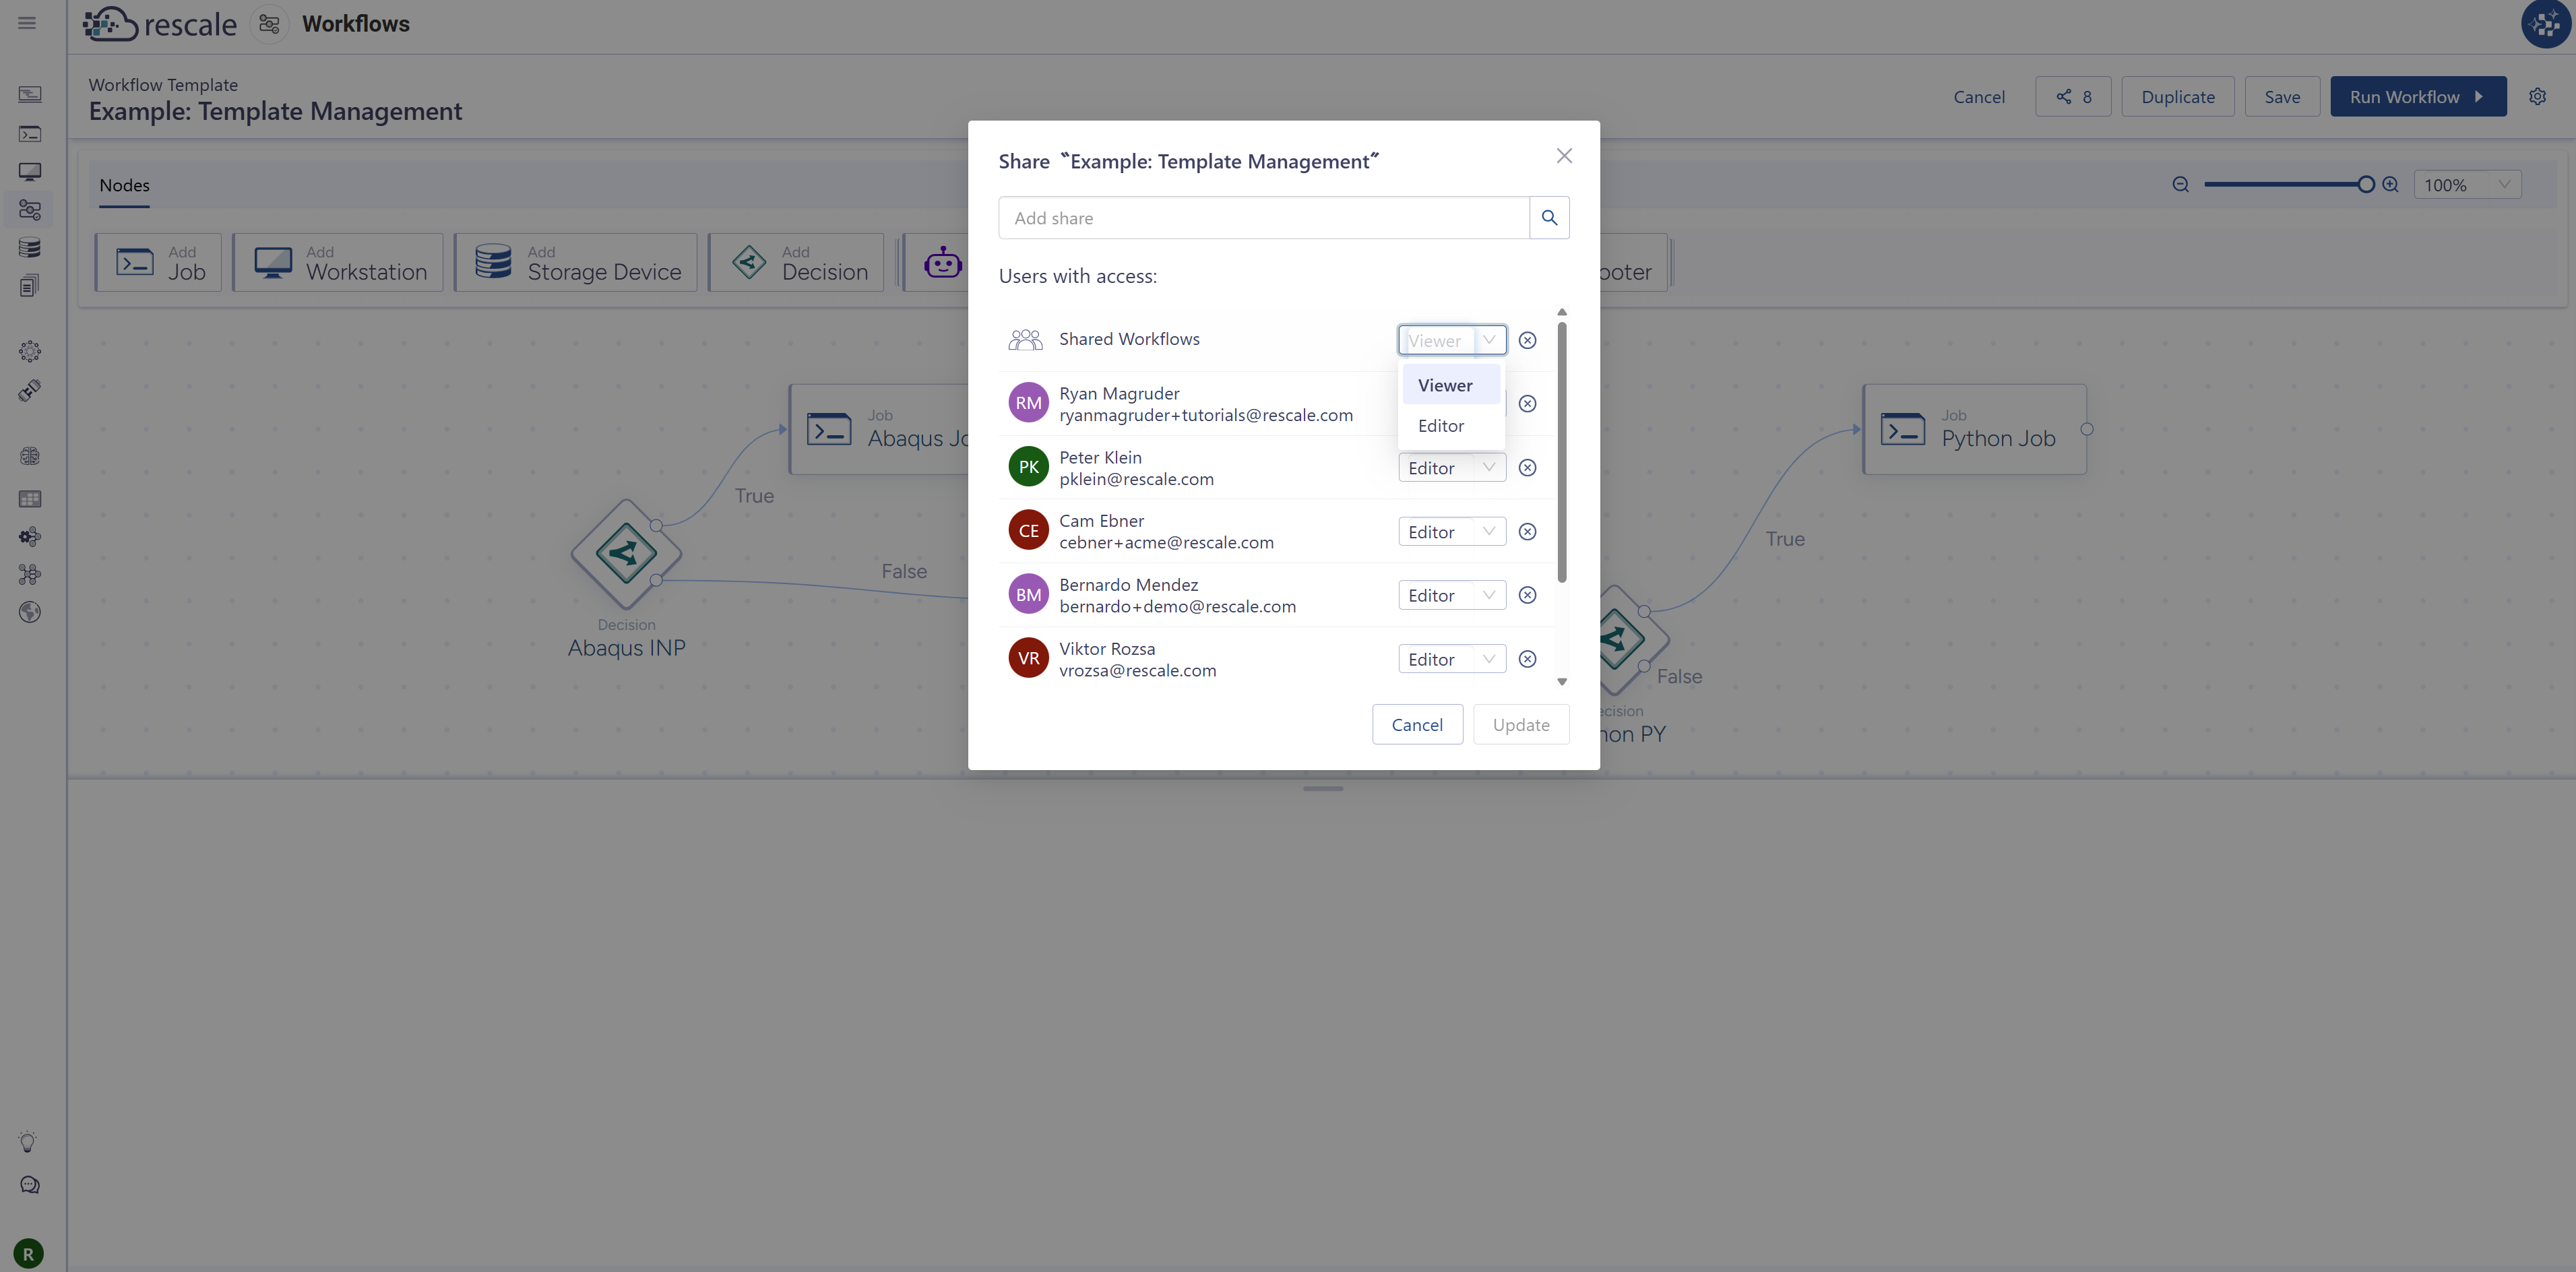
- Open the workflow template from the Workflows list.
- Click Share.
- Search for and select the recipients you want to add.
- Viewers can view and submit the workflow. Editors can view, edit, and submit the workflow.
What's next
Once your workflow template is saved:
- Run a Workflow — Execute your template with specific inputs